Kindred Grove


Get Lost in Family History & Find Yourself

HOME

Tutorials

BLOG

Inspiration

ABOUT

Is Your Ancestor Hiding in a Census for the Deceased?

Is Your Ancestor Hiding in a Census for the Deceased?

Did you know that there are census records that list individuals who died in the United States during certain years? I am excited to help you learn about this fantastic source of death records while also explaining its limitations. So, what is it and how do you find it? I am referring to:

UNITED STATES MORTALITY SCHEDULES

death records genealogy

Have you ever discovered an ancestor who died just before a census and wished so badly that they could have hung on a little longer so you could have accessed more about them? That predicament is incredibly frustrating if you don’t know who their parents were, and the person died prior to the 1880 census, which asked for their parents’ place of birth.

Or was there a family member in one census that doesn’t appear on the next? If so, mortality schedules may help!

The U.S. Federal Government took mortality schedules in conjunction with the following censuses:

1850, 1860, 1870, and 1880.

The 1890 Veteran Mortality Schedule is also available for many states. 

If you are lucky enough to be researching an ancestor from Colorado, Florida, Nebraska, New Mexico, North Dakota, or South Dakota, then you also have access to a bonus mortality schedule from 1885.

(These states participated in an interdecennial census to provide the federal government with specific information for administrative decisions on industry and agriculture, etc.) 

Some states also performed mortality schedules with their state censuses in the years 1855, 1865, 1875. 


The history behind these rare death records:

While collecting population data, census enumerators asked if anyone in the home had passed away during the previous year. More specifically, they recorded deaths that occurred in the twelve months before the census between June 1 (of the prior year) to May 31 (of census year). It is important to understand that not all deaths from 1849, 1859, 1869, and 1879 are available. 

Deceased person’s information, including the cause of death, was collected into a separate entry than the population census. One of the reasons this resource is so invaluable is that most states did not record vital death records at that time. In fact, some states didn’t collect death records until 60 years or more after these mortality schedules. You can see how this resource is a rare treasure for a family historian. Here is a summary of all of the information you can gather from a mortality schedule: 

Mortality Schedules

  • Name
  • Sex
  • Age
  • Race
  • Marital status
  • Place of birth
  • If widowed
  • Occupation
  • Month of death
  • Cause of death
  • Duration of illness (in days)
  • Parents’ birthplace (1870 & 1880)
  • How disease was contracted (1880)
  • How Long the Deceased had been a resident of the county of death (1880)
  • Physician (1880)

Where are these records held?

Many mortality schedules are online; however, they may not come up in record “hints” on your family tree and typically require a specific search because they may not be indexed. Don’t let this deter you! This tutorial will show you how easy it is to find them!

Many counties or state archives have indexed lists of these rolls. If your ancestor’s name is on one of those lists, you can then do an additional search to access the actual record. The number of deceased persons per county typically wasn’t extensive, so finding your ancestor in the image collection is not a difficult process. There may only be a few pages to look through, depending on the location.

How to access these invaluable records: 

 Ancestry.com

Instructions: The link above will take you to the collection. Use the search fields to input ancestors’ names, ages, and locations. Sometimes, less information is more, so it may be more effective to search by only the surname and place. That way, if the record has first name initials or misspellings, it won’t restrict the search. Using various spellings of a name is always a good idea! 

Limitations: The collection does not include every state or year. Use the toggle on the right-hand side of the page to see what states/years are available. If you don’t locate the recordset you need, try one of the next two options.

New Horizon Genealogy

Instructions: Click on the link and select the state you want from the menu. Then select the county and year. Those links will then redirect you to county pages and websites where mortality indexes are listed online. This is a very helpful resource!

Limitations: There are some notes which say there are no available online records for specific locations. However, with millions of records added all the time, this may not be accurate. I have found several mortality schedules for those “missing” states on FamilySearch through image-only collections (not indexed) or digitized books (indexed). If you run into one of those messages, try using the next step to look for the records. 

FamilySearch

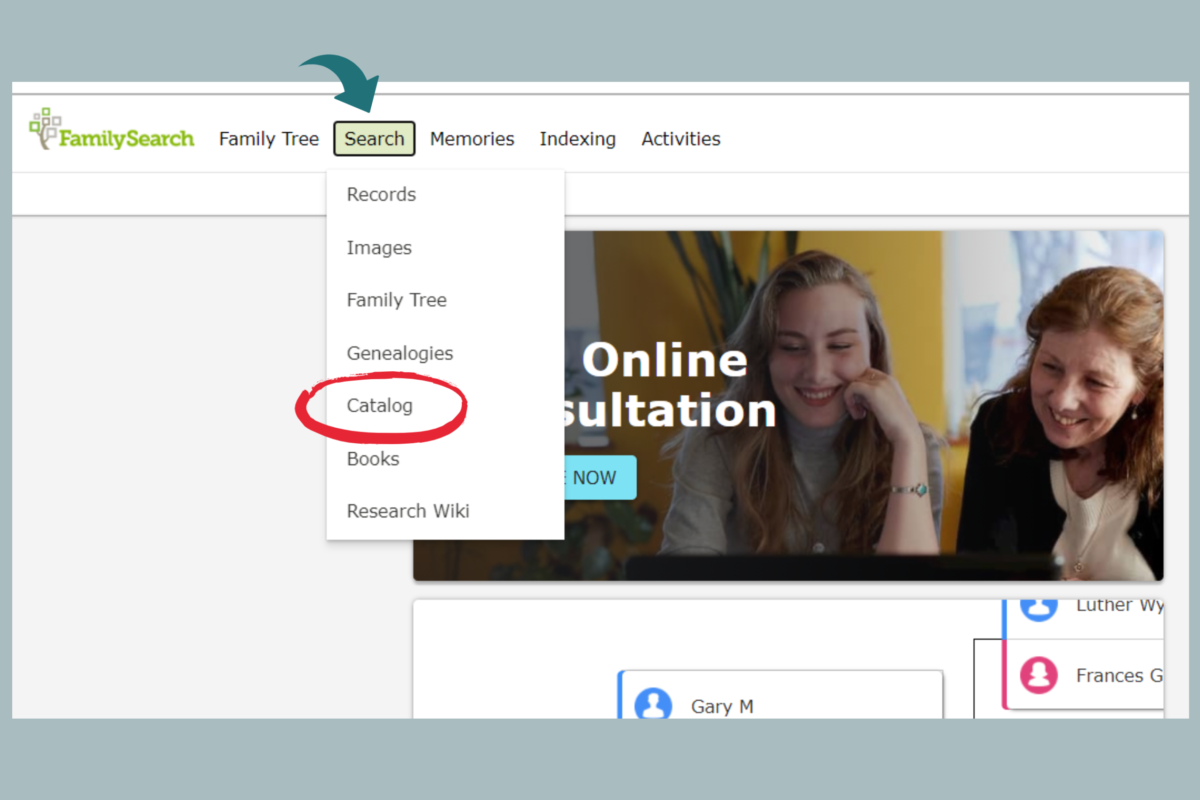
Instructions: Use the following steps to find the records within the catalog: FamilySearch>>Catalog>>State Search>>Census Collections>>Mortality Schedules>>Images>>Records. I’ve included images of each step below to help you navigate to these records. 

Limitations: The only limitation to this process is that it takes a little more time, although it is actually a simple and easy search. 

Select CATALOG from the FamilySearch HOME page:
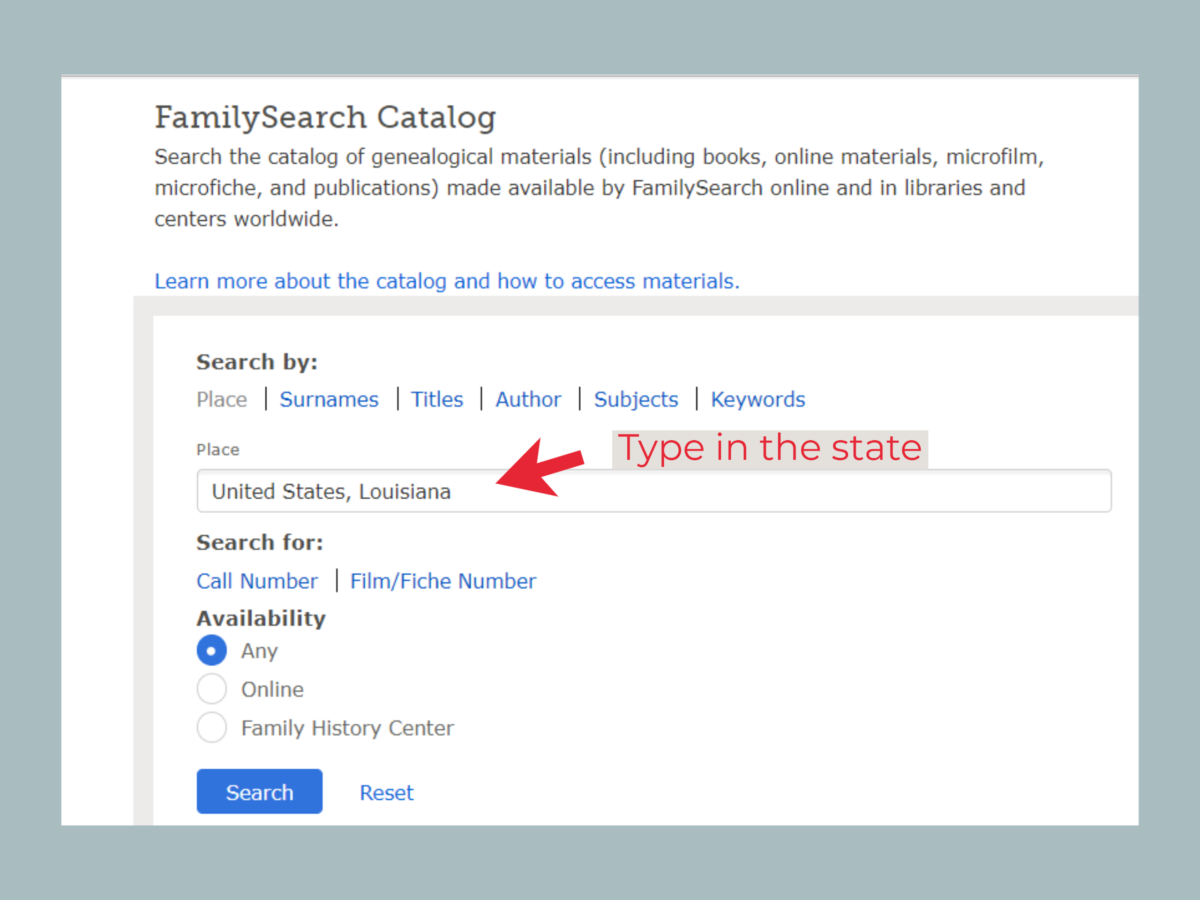
From the CATALOG page, type in the state you want.

A drop down menu will appear and make location suggestions. Select your preferred location from the drop down menu. This ensures that the system recognizes the correct place and returns all the records from that locality. Once you have the correct location in the search field, click SEARCH :
Find the CENSUS YEAR from the menu:
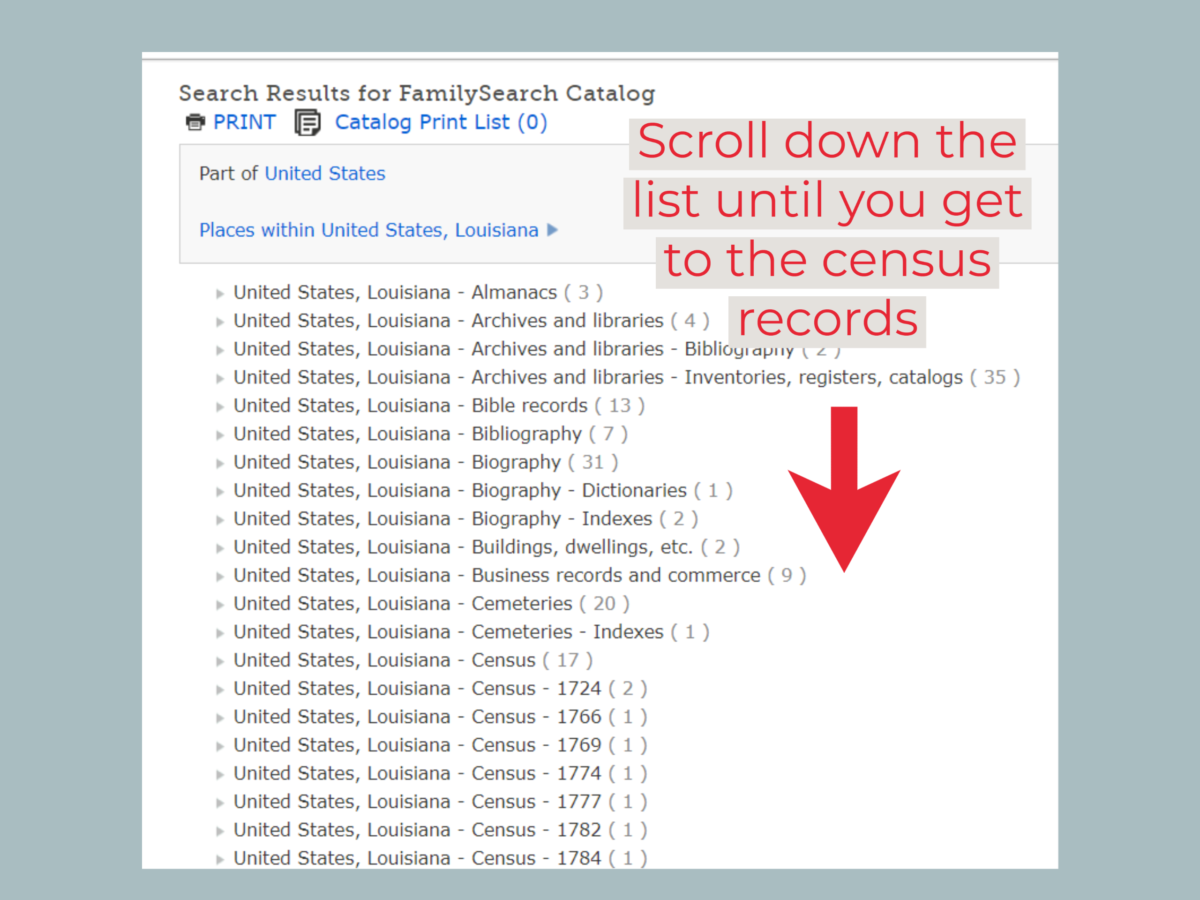
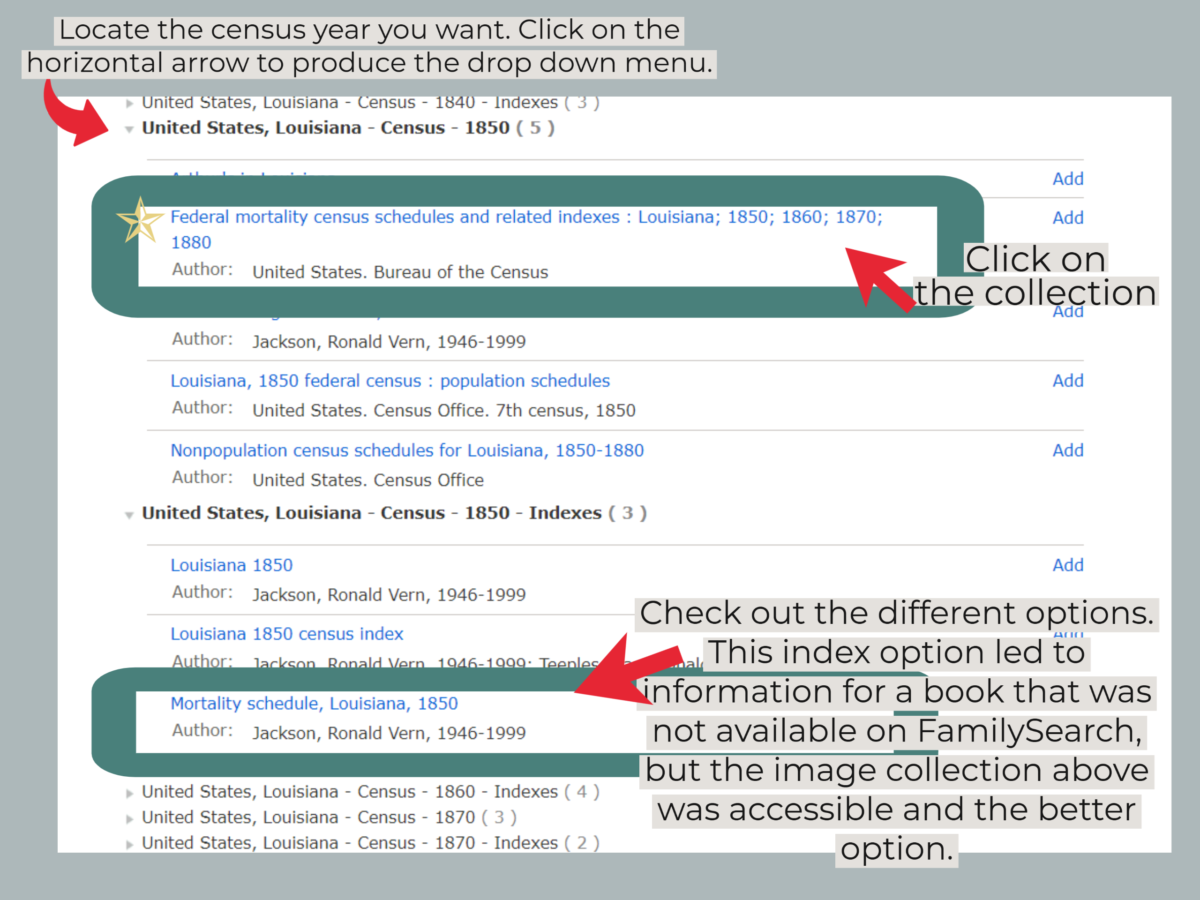
Click on the census collection by year.

Find the MORTALITY CENSUS SCHEDULES from the drop down menu.

Click on that link (in blue):
The record link will redirect you to the next page which will show you what records are available.

The records will be listed through additional links. Try the different links on the page to see where they direct.

Here are some options you may come across: 

A message that says, “To view this collection online: click here“, indicates that the collection has been indexed and is searchable. Yay! Click on the link to search for the record/image by person’s name and location.

Sometimes there are links to an online book on FamilySearch where the mortality schedule is listed. 

Specifically, look for record collections at the bottom of the page. A camera icon next the record set indicates it can be viewed online. A camera with a key over it indicates it can only be viewed at a family history library. A film icon means it is available at the family history library in Salt Lake City, Utah. If this is the case, save the link to that page (create a document for those quick links to come back to) and check back soon. New records are added daily.

Here is a picture of what to look for in this step:
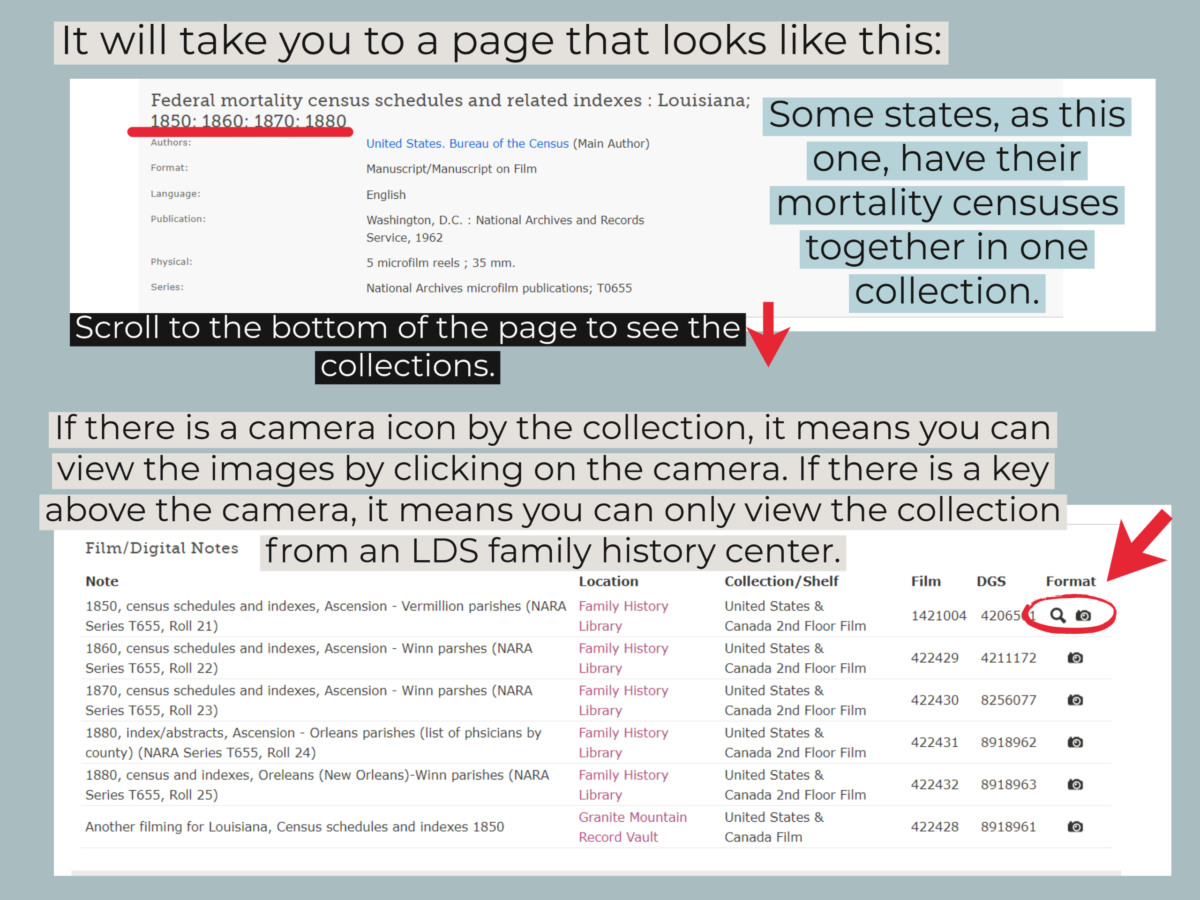
The Image Collection

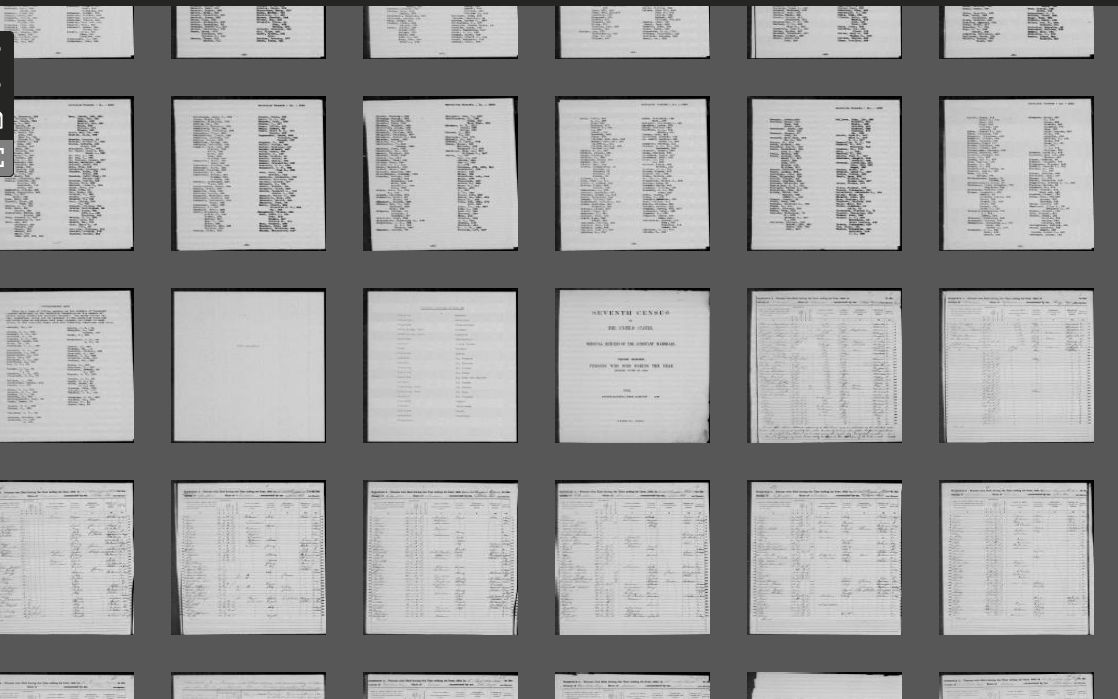
When I clicked on the camera icon above, it opened the image collection. This one (for Louisiana) includes all of the mortality schedules into one record set and a typed index of names at the beginning. You can thumb through those indexes to look for the county, years, and the names of people. Even if your state doesn’t have an index, the records are often alphabetized by county. Scroll through:
Here is an example of the index list from the above collection. It includes the year, name, and page number for the record (which may be different from the image number. If so, look for a page number that is printed on the image.):
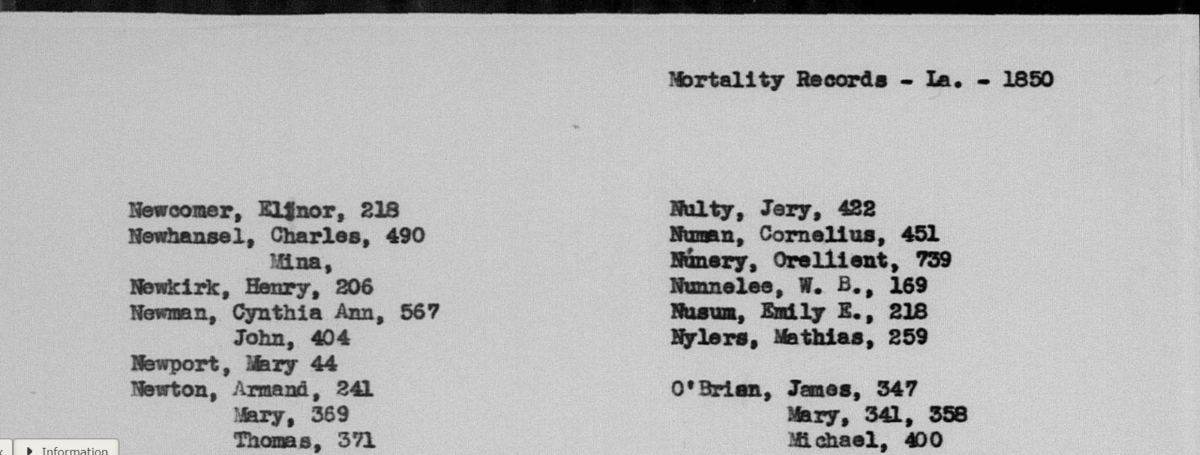
      1850 Mortality Schedule, Ascension Parish, Louisiana. Downloaded of FamilySearch.org.

Here is an example of an actual record. It looks just like a census record, right? Because that is, basically, exactly what it is! 
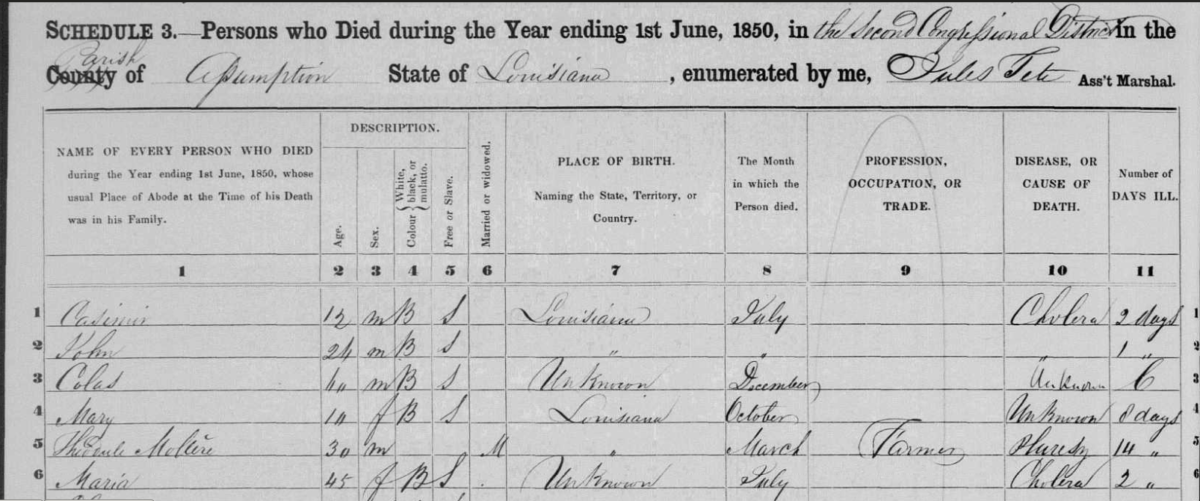
      1850 Mortality Schedule, Ascension Parish, Louisiana. Image courtesy of FamilySearch.org.

If none of these resources have the mortality schedule you need, do a simple GOOGLE search for the specific location and year. ( Ex: “Maine mortality schedule 1870”). Every state is different and a quick internet search may offer other online resources. 

Additional Ways to Use Mortality Schedules in your Family History Research:

  • To find children or babies who may have been born and died in-between census years. Parents’ names aren’t listed, but through surname, parents’ birthplaces, and other clues, you may be able to find that child in a cemetery and determine if they were a child of an ancestor. 
  • To learn family medical history.
  • To gain detailed information about African-Americans. This is especially helpful for researching enslaved individuals as it offers vital details about their life/death, place of birth, and where their parents were born. You may find more information on a mortality schedule than any other record. 
  • To learn more about all minority groups, where they were from, and what industry they worked. 
  • To learn about migration patterns in a family by discovering where an ancestor or their parents were born. If a person is listed on the 1850 mortality schedule, it may have been the first record where their birthplace was recorded. 
  • To learn more about women and children not recorded on previous records. Maybe there is someone that should be in your tree but has never been discovered. Peruse the 1850 mortality schedule and look for family surnames. Only head of households were listed on the 1840 census, so most women, children, and even young adults did not appear in those records. The 1850 mortality schedule offers pertinent information for those whose names may or may not have appeared on any other document. 
  • To learn more of the difficulties that your ancestors endured in their life. These records can paint a broader picture and help you learn more about your ancestor’s story. Did they die from an accident, a plague, a fire, tornado, etc.? You may be able to use the information you discover and learn more through a historical search or newspapers at the time. What was life like for a county that was plagued by cholera? What were the details of the tornado that hit their town? How did the people move forward after such events? You can learn a lot about the significant events of your ancestors’ lives through the accounts of others and in newspapers. These details can also help you to understand what family members of the deceased might have experienced. 


Worth the Effort?

It may seem like the odds of finding a family member in one of these records are small, but you may be surprised. Do a quick scan of your family tree and look for individuals who may have died in the year before a census. 

I found many candidates as I did so. I was so amazed and excited by the information I discovered. I knew right away I wanted to do this tutorial. 

Have you ever found any gems through mortality schedules? I would to hear if this process helps you to find something new. 

How to Get Photos of your Ancestors That Aren’t Online

How to Get Photos of your Ancestors That Aren’t Online

Searching for Old Family Photos

Not too long ago, I did not have a SINGLE PHOTO of an ancestor. When I began doing family history research, I was thrilled to find a handful on Ancestry.com. However, I learned that if I wanted to access more of my ancestors’ photos, then I needed to make some actual connections with distant family members. I didn’t want to wait years for the possibility that someone might upload them to family history sites when I knew there were photos out there on shelves and in attics of distant cousins.

It might seem intimidating, but before you discount this idea, I recommend that you at least read through these ideas and consider them. What has taken a small investment of my time has returned with priceless family treasures! It is so worth it and I am here to walk you through it, step-by-step! 

Through experience, I have learned what does and doesn’t work when it comes to reaching out to long-lost cousins and have compiled all these tools into a list for you. I have used this process many times and am so excited to share it so others can have success at finding old family photos and can experience the joy and excitement I have. 

Here is the method I use when requesting my ancestor’s photos from distant relatives:

STEP-BY-STEP GUIDE TO FINDING ANCESTOR’S PHOTOS


  • Choose one family line- or ONE ANCESTOR, whom you’d like to learn about more. 
  • Create a family tree for that line and work on finding their descendants, rather than their ancestors. This is called descendancy research, rather that ancestral research.
  • Start with the ancestor you want to find photos of and after adding their information- such as dates and locations, add all of their spouses and children. Then fill in the next generation(s). 
  • The goal here is to make your way down until you Find Living Relatives! Ask your close living relatives (parents, grandparents, aunts & uncles, etc.) about any extended family members they know. Write down any names and other information they may have-such as location, occupations,etc.
  • Use hints on your family tree to fill in additional family information. 
  • Look for obituaries for the family. Obituaries often give names and locations of the living family members.
  • Use Google, Facebook, and people finder sites to locate even just one or two living relatives. You can start there and see where it leads. Keep notes of what you have found and what is missing.  
  • As you research all the children of your ancestor,  don’t forget to include their spouses and children. Then find the last known locations where they lived. Add all of this information to your family tree or to a document. Online trees will keep information private for all living people, so just make sure they are marked as LIVING in your family tree.  I also love using GOOGLE DOCS for notes and memories, etc. It’s free, it automatically saves all of your work, and you can use the app on your smartphone when you are away from the computer. All you need is a gmail account to also access Google Docs for free. LINK HERE
  • Once you locate living relatives, you will need to choose who to reach out to first and then write letters, Facebook messages, and/ or make phone calls explaining who you are. It is essential to give your relationship- how you are related to your ancestor and them. Explain that you have been researching your ancestor and want to connect to the other family members. Be specific with the necessary details. I usually start by contacting one person and go on to the next one if needed. There’s usually no need to write everyone unless you have an urgent request. I usually gain some information as to how to proceed from the first or second contact, so that is why I don’t typically send out more than one letter at a time. However, it is up to you. 

Here is something to keep in mind when trying to decide who to reach out to first in a family for memorabilia. Start with the youngest daughter and her children. She was probably the last child living in the home with her parents and is often a caregiver for parents in their latter years- therefore, she typically inherits the family photos and such. 

How Should You Introduce Yourself?

 Here is one example of what you could say, “Hi there. My name is Melissa. My mother’s name is Sallie Rogers, and she was the daughter of Ben Rogers from South Carolina. I am looking for a distant cousin named Tom Harrison. Do I have the right person?”

If they say you have the right person, you could proceed by saying,  “Yes? Oh great! I believe your grandmother may have been my grandfather’s sister. I’ve been researching our family and looking for some of my relatives and came across your name. Was your grandmother Frances Rogers from South Carolina?” 

 Lead into the rest of the conversation from there. 

  •  When reaching out via phone call, do not immediately ask for photos or anything other than making sure you have the right person. Wait for a response before you proceed. 
  • If you’re sending a letter or email, attach a photo of yourself or your family. Tell them a little bit about yourself.  Be transparent about who you are. It will help to build that trust quickly. Some people are very wary of being scammed and for a good reason!! Some people can form a connection quickly over the phone by hearing your voice and intent, but that can be harder in a letter. So you’ll want to include something that helps them to trust you. 
  • Ask them about their branch of the family (but don’t ask anything too personal) and try and make a connection! Build on something! Be sincere. Please don’t be fake. These are your relatives! You could ask them if they keep in touch with other cousins, ever visited Grandma’s home etc. 
  • If this person is a “sharer”, please listen to what they have to say. Especially if it is an older person, you may be the first phone call they’ve had all week. Remember that the older they are, the more information they may have to into the family history. They deserve to be cherished as if they were a sea of family knowledge- because they probably are. Take notes! 
  • Share a little bit about your journey, but keep it brief. Your distant relatives don’t need to know how many hours you have spent researching this ancestor and every frustration you’ve encountered. Just explain why you are researching this ancestor and what they mean to you.

How to Ask For Ancestors’ Photos

  • After properly introducing yourself, ask very politely if they had any photos (or stories or other memorabilia) they would be willing to share. Briefly reiterate why it is so meaningful to you. Try and spark an emotional response. This is what causes people to take action! It doesn’t require you to share your whole life story or give a sob story, but you will want to share a reason of WHY you want them. Open up a little bit. Formulate a genuine reason that you’re comfortable sharing. Be sincere and truthful.

Examples of How to Ask for Photos

 “I would like to learn more about Grandma Rogers and her life. I’ve never seen a photo of her, and it would mean the world to me to see what she looked like.”

I typically think it is best to be positive with a stranger, but if you have a brief personal story that is a little tender and you feel inclined to share, go with your gut.

For example, “My mom’s family moved when she was very young, and she missed her grandmother very much. She never had a photo of her grandmother- only memories in her heart. I would love to find a photo of her grandmother as a surprise. It would be the greatest gift to give my mother!”

How would you respond if someone asked you like that verses just saying, “Can you send me copies of any photos you have of the family?” 


  • If they say they do not have any photos of your ancestors, ask if they have any memories, traditions, or stories that were passed down. And also, ask if they know anyone else you could ask. If you talk to one person who had 5 siblings, ask them who is still living and might have any information. You could also ask if they would be willing to give you the best contact information for that person. They could save you a lot of time! 

Feel out the situation. Don’t be a nuisance if someone doesn’t sound interested in talking to you. But if they are receptive and friendly, be ready to ask a few more questions to help with your next step (within reason- no interrogations) so you don’t have to keep calling them back. No one likes a stalker. 

TIP:

Also, remember that sometimes a widow may have photos for her husband’s family. Just because your male cousin may be deceased, does not mean that he shouldn’t be considered. Include the spouses of family members as much as you consider the blood relatives themselves!

  • If your relative says that they have some photos they could share, show your excitement, and then offer a way to make it easier for them to get them to you. Offer to pay for the scans and/ or copies and offer to pay for someone to do the scanning for them (like a copy center, etc.).  Many people are overwhelmed by the process of scanning photos- especially if there are many or if the person is not technologically savvy. Showing that you are willing to help makes people more inclined to help you because it makes their part easier and they can see how much it means to you!!! 

Depending on how many photos they have will probably determine whether the scans should be emailed, printed, or put on a flash drive and mailed, etc. You can discuss these options once they tell you what they have in their possession.

Another piece of advice I would offer is to go along with whatever process they are most comfortable with! For instance, after you make some suggestions, if they suggest something different, JUST GO WITH IT! For example, if it is easier for them to makes copies at Walmart and mail them, gladly accept! Even if that isn’t one of your suggested ideas and if it costs you more money than having them scanned and emailed, remember that uploading and emailing photos may be a daunting task for many people and they may feel overwhelmed at your request.

I like to tell my relatives, “I am fine with whatever is easiest for you! Just let me know how you would like me to help and pay you for them.” 

If you push them to send them in a way that is unfamiliar and intimidating, then you may never see those photos. A well-meaning person may write you off if you ask something that seems too difficult to them. Even if you think you are suggesting a plan that is really easy, if it is foreign to them, they may think it sounds hard. Remember that the goal is to acquire family photos. If you let them help choose a method that they can accomplish easily and fits well into their comfort zone, you are much more likely to receive the photos! 

**As a side note, although I have offered to pay for photos/scans every time, I have never actually had someone let me pay them. I offered this with an absolute intention to pay but the relatives I contacted ended up scanning and emailing or taking a picture with their phone and texting. (Which by the way, that isn’t a *perfect solution, but beggars can’t be choosers right?) If you really want those photos, be willing to either pay or settle a little bit. I am grateful for all the photos I have received- regardless of the method. It’s important to recognize that they will be such a joy to you even if they aren’t perfect scans! Be willing to let go of expectations of perfection. 

  • Always offer to SHARE anything you may have  with your newfound cousins! Documents, information, your own family stories and traditions, and family trees, etc. are great things to offer! If they aren’t interested, don’t push it, but at least offer to reciprocate in some way! 
  • Give them your contact information (preferably more than one method) to get back in touch with you.  Or ask them if you can call them back again sometime. (Not too soon). 
  • Express Sincere Gratitude for their willingness to talk to you and consider your request!
  • Send a thank you card, stay in touch, become friends on Facebook if you feel they are interested in having further contact. Don’t force it but do INVITE. 
  • After you have completed the process, REPEAT it for another ancestor. 

Successful Interactions

This process wasn’t very comfortable for me in the beginning, to ask strangers (even related strangers) for a favor. Still, I have found the overall response has not only been positive but also very rewarding! Not only have many cousins shared some pictures with me, but they also have kept in touch and been interested and excited to learn about other members of the family. I have been humbled and surprised at the generosity of others who are willing to help.

This certainly isn’t always the case, and there are many reasons some people do not join in your quest such as illness, difficult life circumstances, busy workloads, etc. so try not to judge if someone is a little gruff. You probably won’t understand what is causing their resistance. In that case, just apologize, thank them for their time and wish them well. You never know what they might think or decide to do after you have hung up the phone. They may choose to call you back the next day if you were polite and respectful. So don’t burn any bridges.

I find that more often than not; extended cousins are happy to help or direct you to someone else. Hopefully, like me, you will be able to look back in a short time and realize how much you have gained in family memories and memorabilia if you will take the time to go after them!

Have you had any luck obtaining your ancestor’s photos using this method or anything similar?

I will send a prize to the first person who tries this method and leaves a detailed review or comment! Please share your wisdom or experience in the comments below! 🙂

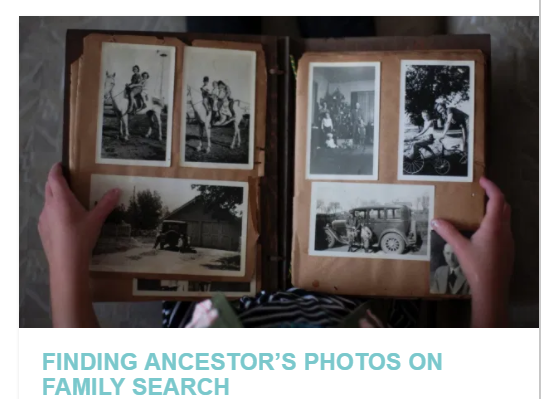
Family Search is a free site that has many photos that have been added by contributors.  Click the link below for a tutorial on accessing what is available there.

How To Easily Transfer Records Using Record Seek

How To Easily Transfer Records Using Record Seek

We all know how important it is to document our genealogy research. Not only does it help to verify the correctness and location of the information, but it is extremely helpful when you need to find it again. I have come across some exciting information in Family Search and Ancestry for an ancestor, only to discover that the person who added the data gave no indication of where they found it. I think that happens a lot because many people just don’t know how to create a source for their discoveries. But, one of the greatest blessings of having online trees is the opportunity to collaborate and learn from each other! And I always want to give thanks and credit where it is due!

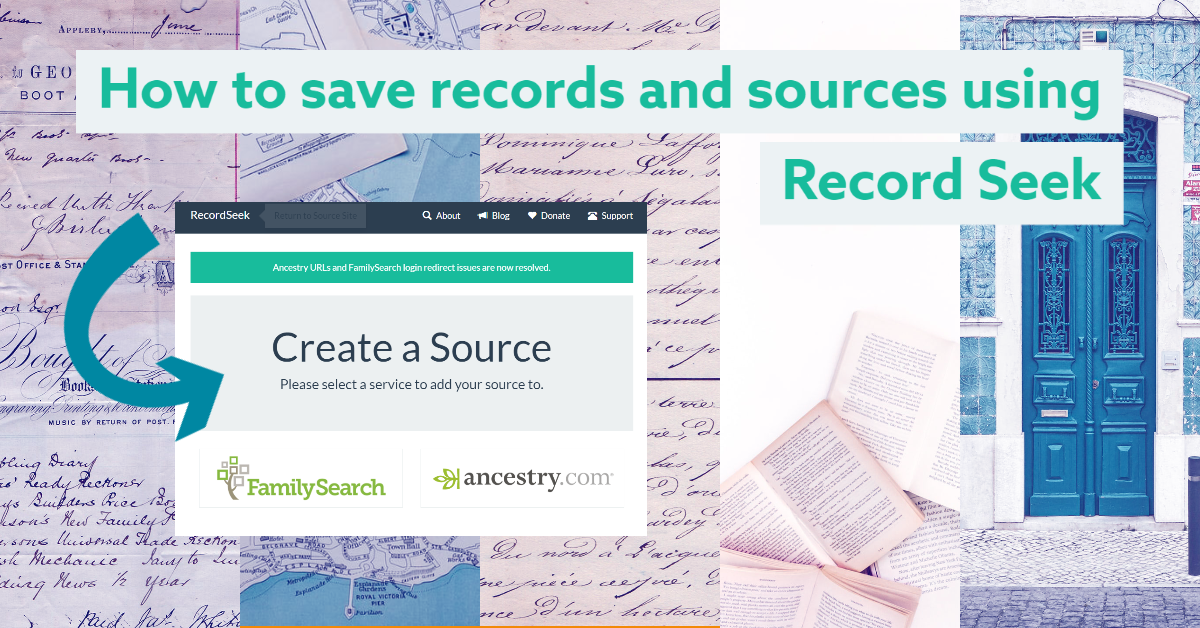
So if you have ever found a record, document, book, or any other source for an ancestor and wanted to save it to your tree but didn’t know how, then this tutorial is for YOU!  I hope you will love learning how quick, easy, and convenient it is  to create these sources in Family Search or Ancestry using Record Seek. Feel free to leave any other questions below.

You can find the Record Seek extension HERE. 


Pin It on Pinterest