Kindred Grove


Get Lost in Family History & Find Yourself

HOME

Tutorials

BLOG

Inspiration

ABOUT

How to Set Up a Free Family Tree In FamilySearch

How to Set Up a Free Family Tree In FamilySearch

Getting Started

Do you want to learn about your family history but don’t know where to start? If so, this post is for you.  There are probably a million and one ways to begin your family history and they are all great. There’s no one right or wrong way. Doing family history is a wonderful and rewarding journey and any method you choose to start will reap benefits.

However, so many options can make it overwhelming for many people to know which is best.

That is why this tutorial is going to guide you through setting up a tree in FamilySearch.org. 

Here are a few reasons that FamilySearch is the perfect format for beginners (but not only beginners!).  

  •  It’s FREE
  • It is a collaborate tree; therefore, multiple people share the research, photos, and stories etc. for common ancestors.
  • It’s user-friendly and has a lot of great features on the site for all ages to enjoy.

Make sure you have created your free account In FamilySearch and are on the home page. Select start (Circled in the photo below). 

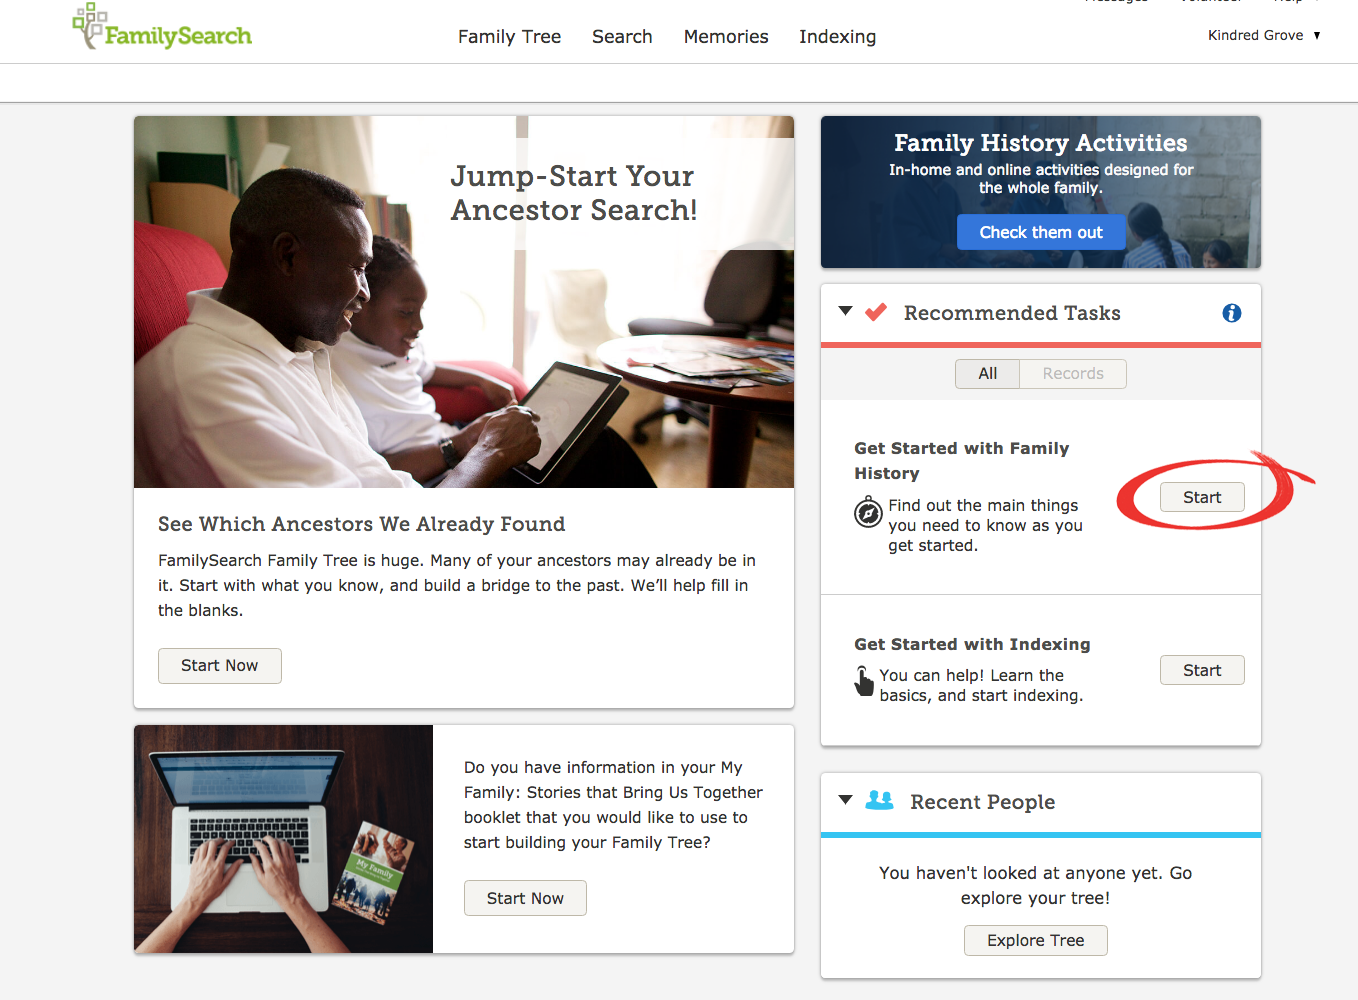
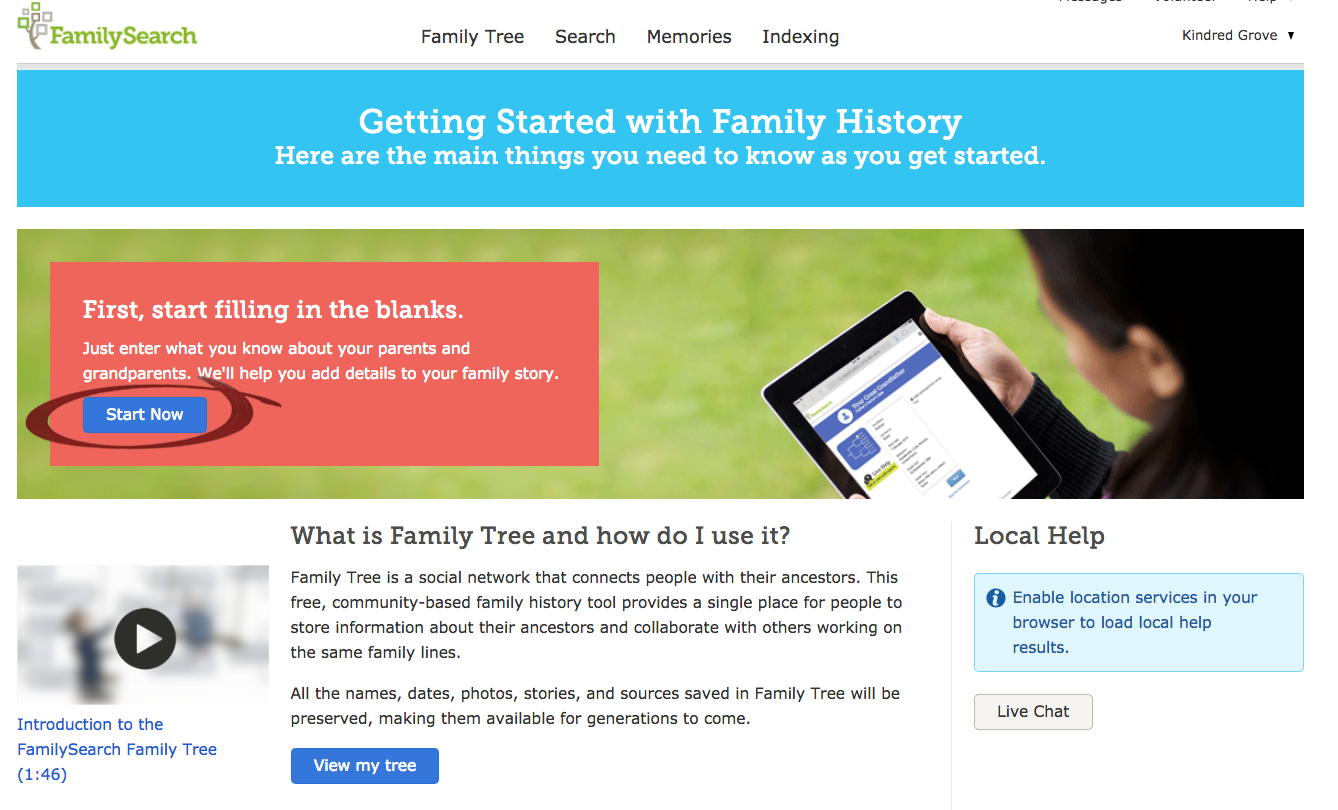
This will take you to a new screen.  There is a short video tutorial on the middle left that can help, but I will also show you step by step so click on the blue START NOW button.  

ADDING YOUR PARENTS

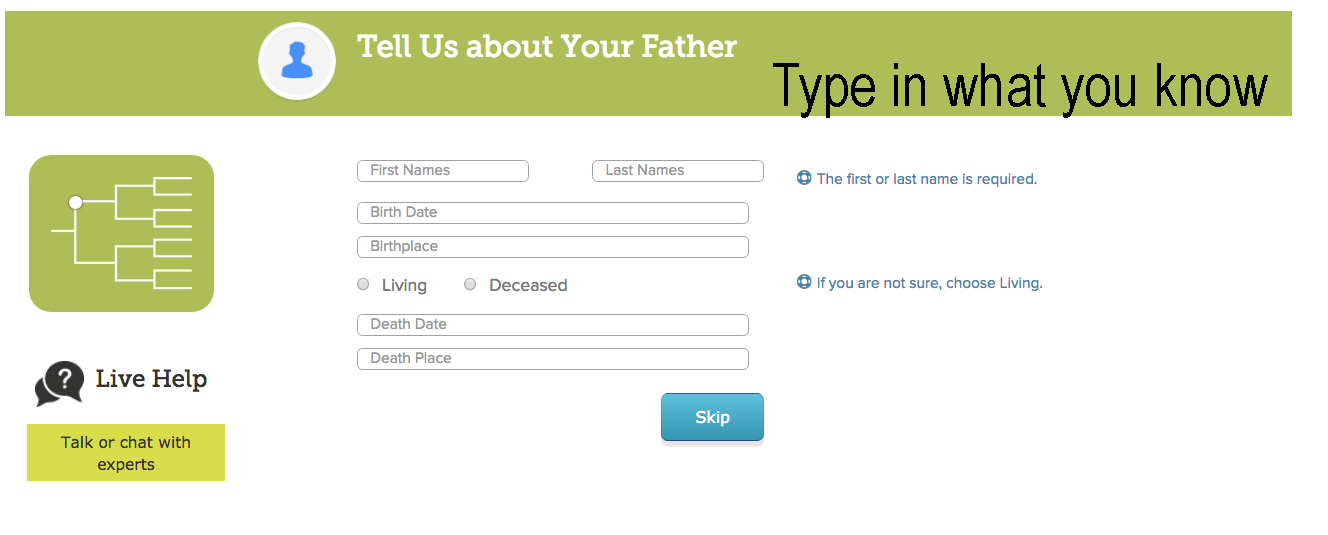
The next screen will ask you about your father.  Include as much information as you can but don’t stress too much if you don’t know all of his vital information.  You will be able to add in or correct information later if you need.  The more you know, the better, but don’t feel like you have to call all of your older aunts, uncles, cousins and the courthouse to get every record.  You will probably be surprised what will be at your fingertips in Family Search once you get connected.

If don’t know your father, just click SKIP, and it will take you to next screen where you can start working on your MOTHER’S LINE.

One of the most important selections are the LIVING or DECEASED buttons. 

Make sure you select the correct option.  Family Search is ONE GIANT COLLABORATIVE TREE

If your parent has passed away, their information may already be in Family Search.  You will want to see if there is a match available.  I’ll show you that process in one of the next steps, but keep that in mind.

 Information on living people are kept private in Family Search.

Filling in the parent information:

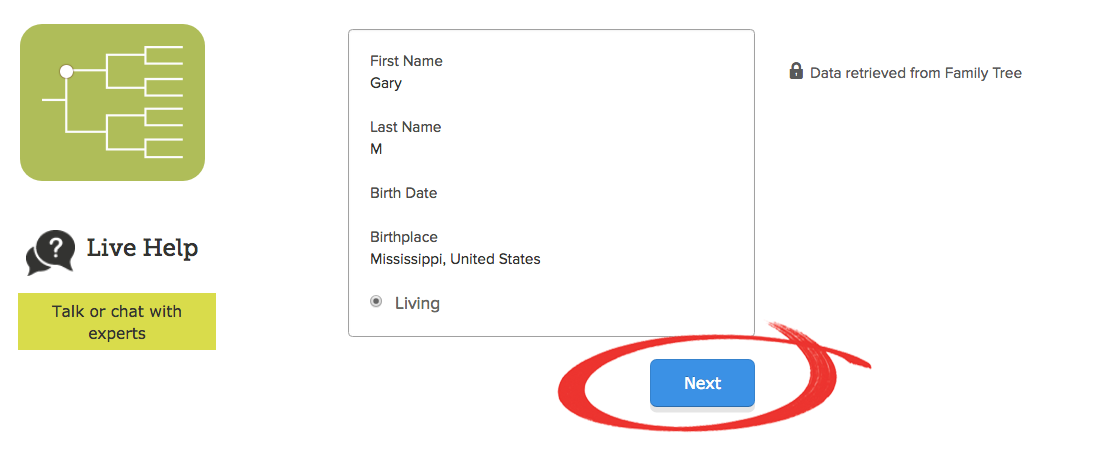
Once you have entered in your information, it will list it back to you.  If this looks correct, click NEXT.

This will take you to the screen for adding information on your mother. 

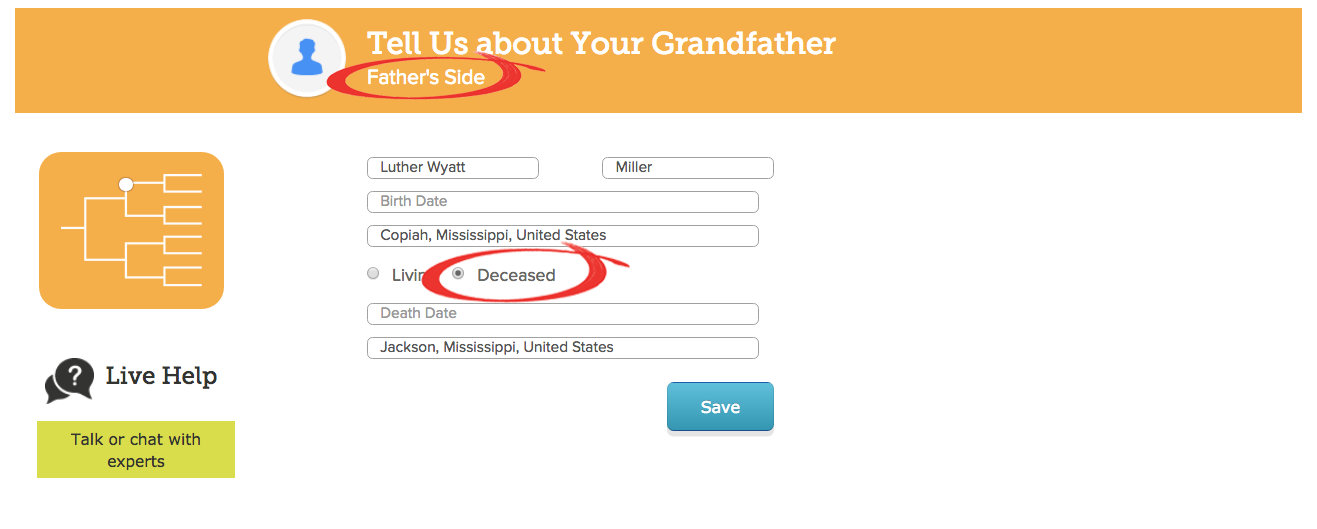
ADDING YOUR GRANDPARENTS

 After your parents have been added to the tree, it will ask you about your grandparents.

Follow the same steps as listed above for your parents. 

PAY CLOSE ATTENTION TO WHICH SIDE OF THE FAMILY YOU ARE FILLING IN!

Add as much information as you can, but don’t worry if you have to make some guesstimates.  Even guessing a little on the date or location can help narrow down search results.  If you aren’t sure of the town, but you are pretty confident on the state, then JUST ADD THE STATE.  Sometimes less information is more when you are making a guess.  

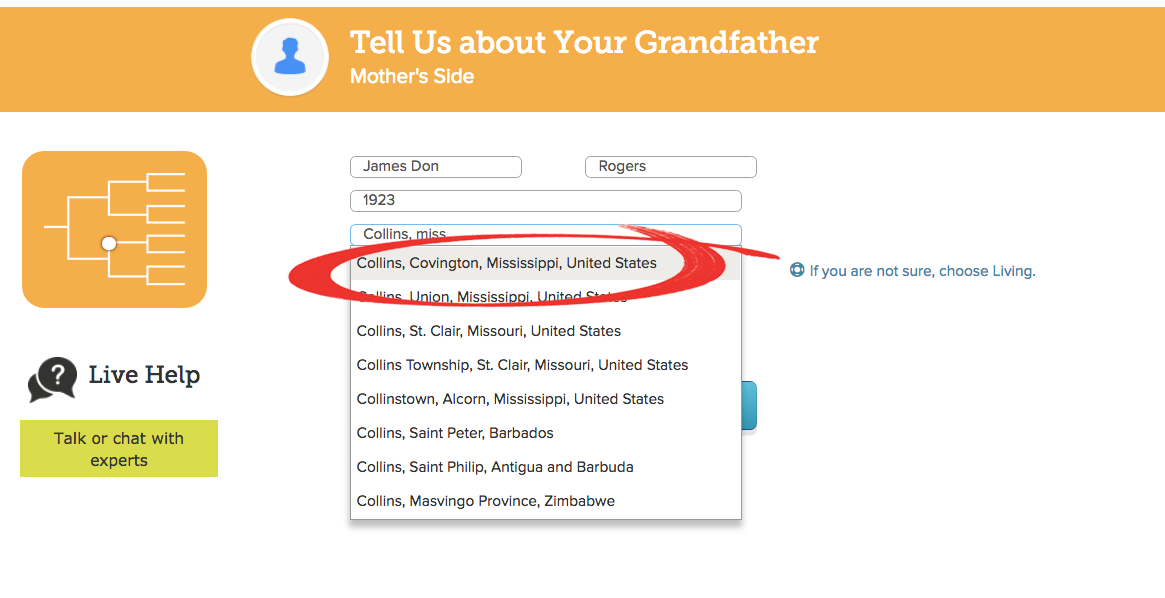
Standardized Information

There is another thing that is important but a lot of people skip over. 

When you begin to type in vital information such a date or location, there will be a drop down menu to offer you some suggestions. If a suggested date or location pulls up that correlates with the correct information, SELECT IT- EVEN IF YOU’VE ALREADY TYPED IT IN!

This is why this is so important.

 FamilySearch, like any website, has a preferred method for data entry. In FamilySearch it is called STANDARDIZED FORMAT. Not only does standardizing information keep the pages looking nice and tidy, but when the vital information is standardized, the system is able to scan its database for correlating records and information more effectively.  Basically, this means the system can do a much better job of finding record hints for your ancestors. You want those! 🙂 

So, ALWAYS CHOOSE FROM THE DROP DOWN MENU if you can. 

If the system doesn’t give you a correct suggestion, put the information in as you know it and move on.

AN EXAMPLE OF SELECTING A STANDARDIZED LOCATION:

Here is an example of adding my grandmother-

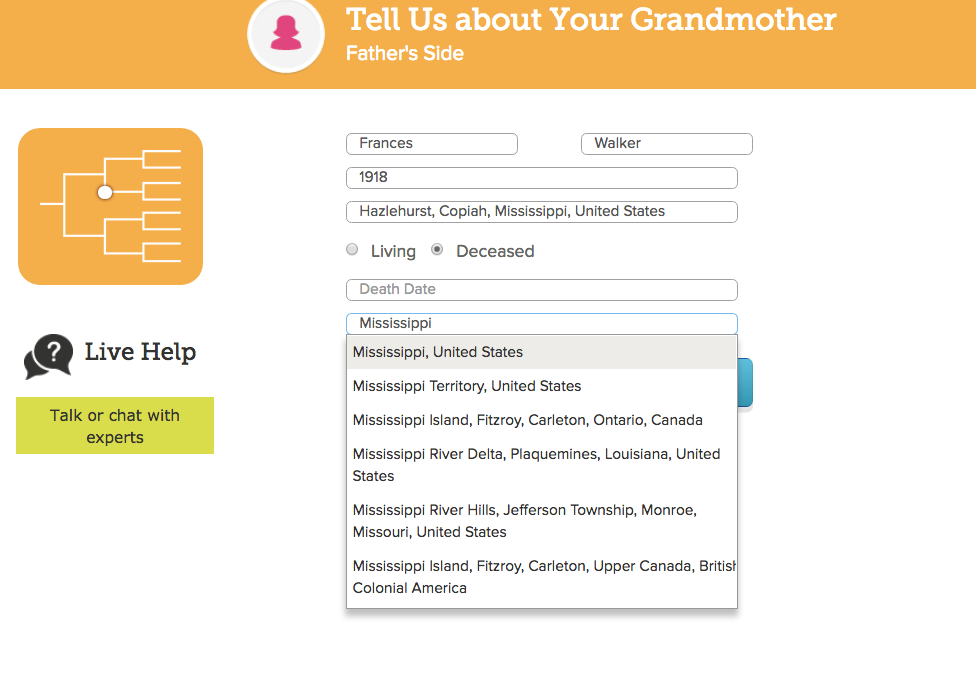
After typing in her information, a window popped up with the following information:

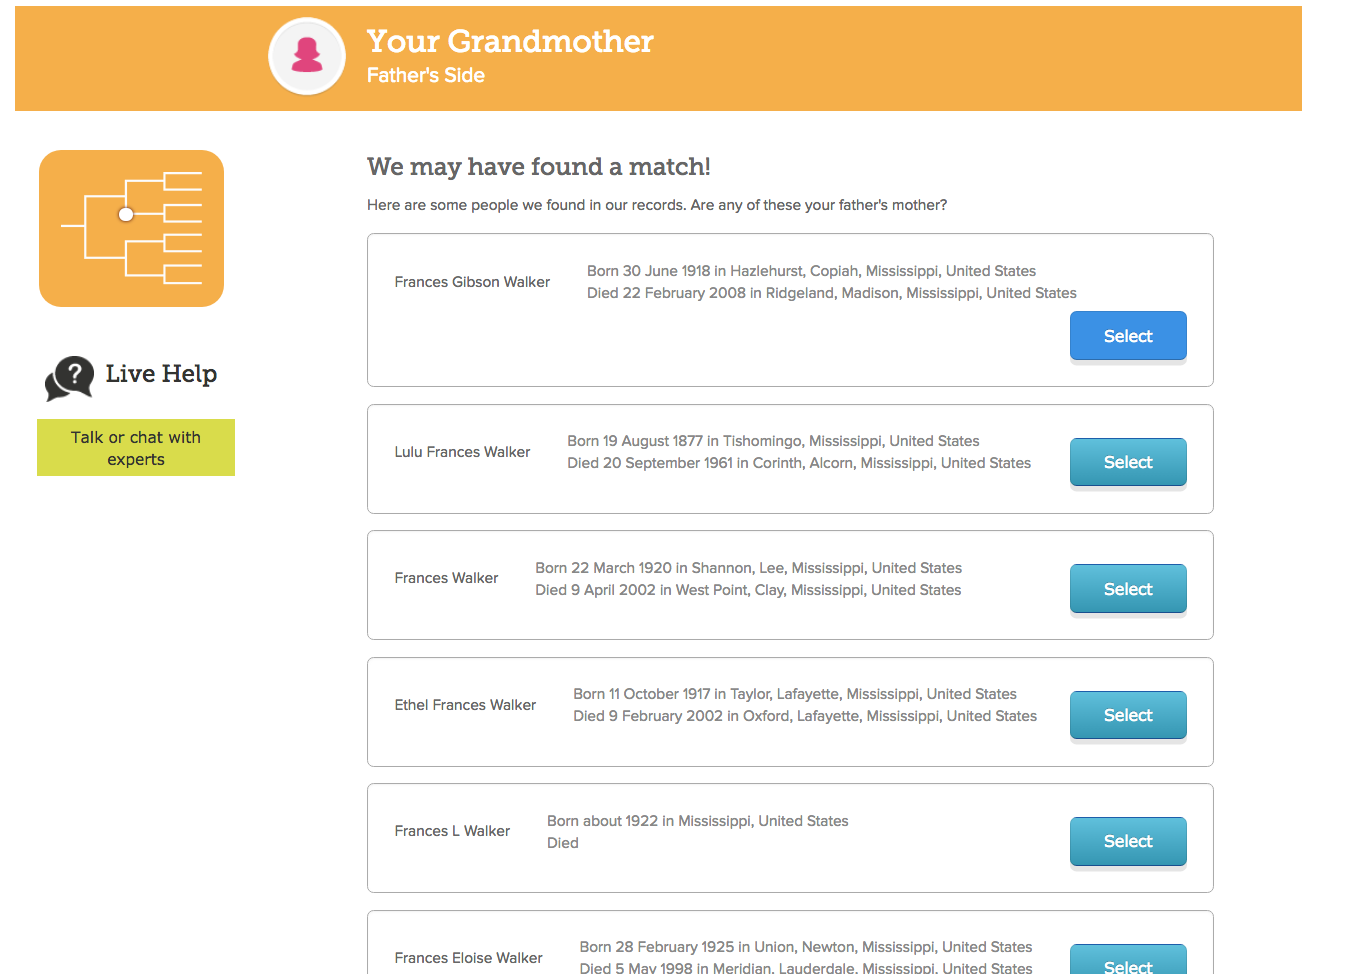
Because my grandmother is deceased, Family Search scanned the site to see if she was already in the tree and they offered some matches. 

Make sure to look through the suggested matches and CLICK SELECT  if you see the right person in the list. 

This is going to jump start your tree and save you a lot of work.  By only having each person in the tree once, it keeps things organized and helps to make connections, research and use records more efficiently. 

If you do not see the correct person in the match list provided, select NO MATCH and move on. 

There is a way to merge two people also if you later find that you have made a mistake.  Don’t be afraid to use the system because its new to you.  You will learn as you go and you aren’t going to break anything. 

Any mistakes can be corrected (and don’t we learn by trial and error?) but it will save you time and headache if you can choose the correct entries from the start.  

GREAT-GRANDPARENTS

The next steps are the same for adding your GREAT-GRANDPARENTS.

Since I found matches in the system for my grandparents, there was a good probability that they were already connected to their parents in the tree. So, I chose not to manually input my great- grandparents at that point, but selected SKIP to go on to the tree instead. 

If you do the same and find that your grandparents are not connected to their parents, don’t fret. They can still be easily added.

Being able to put in a generation or two and have the rest of your tree generate for you is one of the benefits of a collaborative tree.  And of course, this won’t be the case for everyone. FamilySearch tree is worldwide, but if your family is from countries where family records and documentation are sparse, there may not be much in the system on your ancestors. This is why it is important that we all collaborate and add what we know or have.

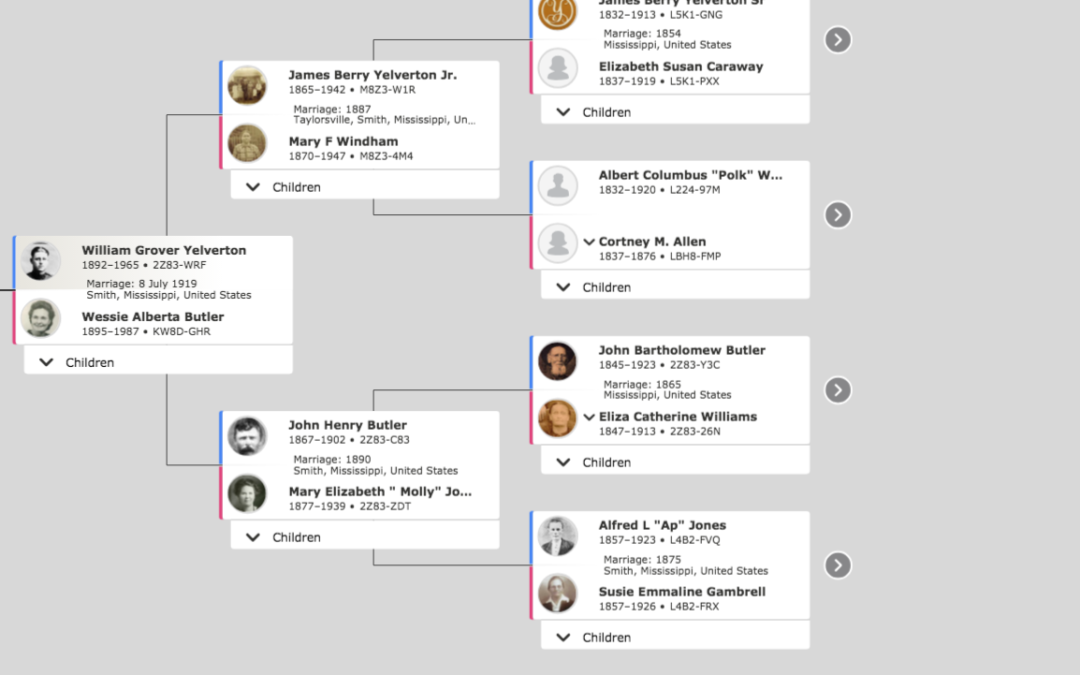
At this point, your family tree will generate and be ready to view. 

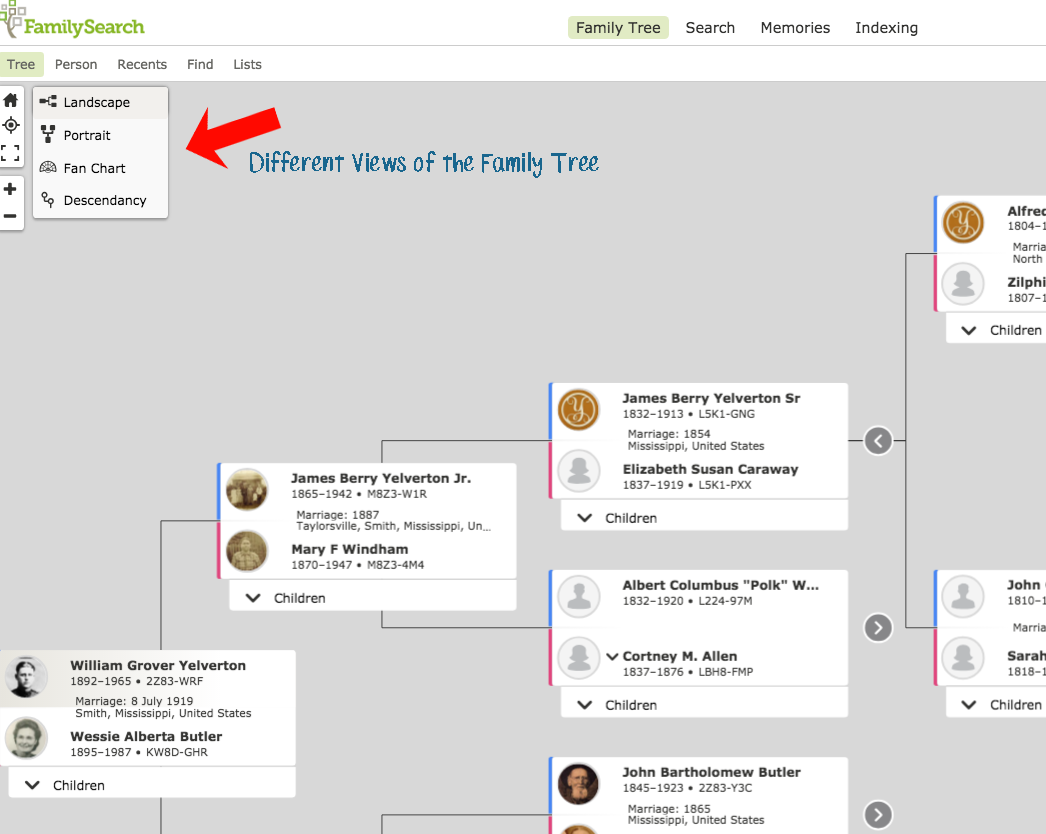
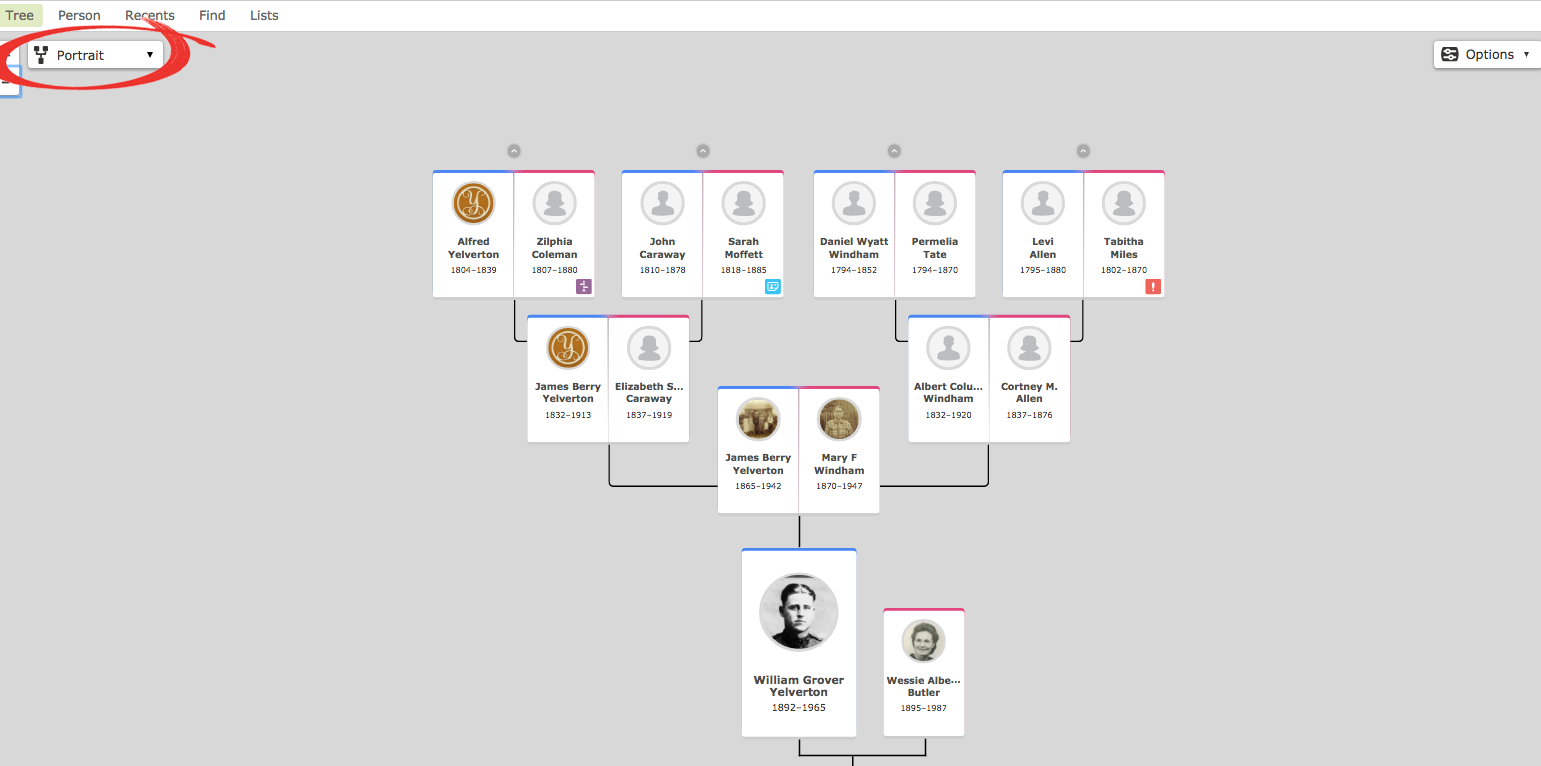
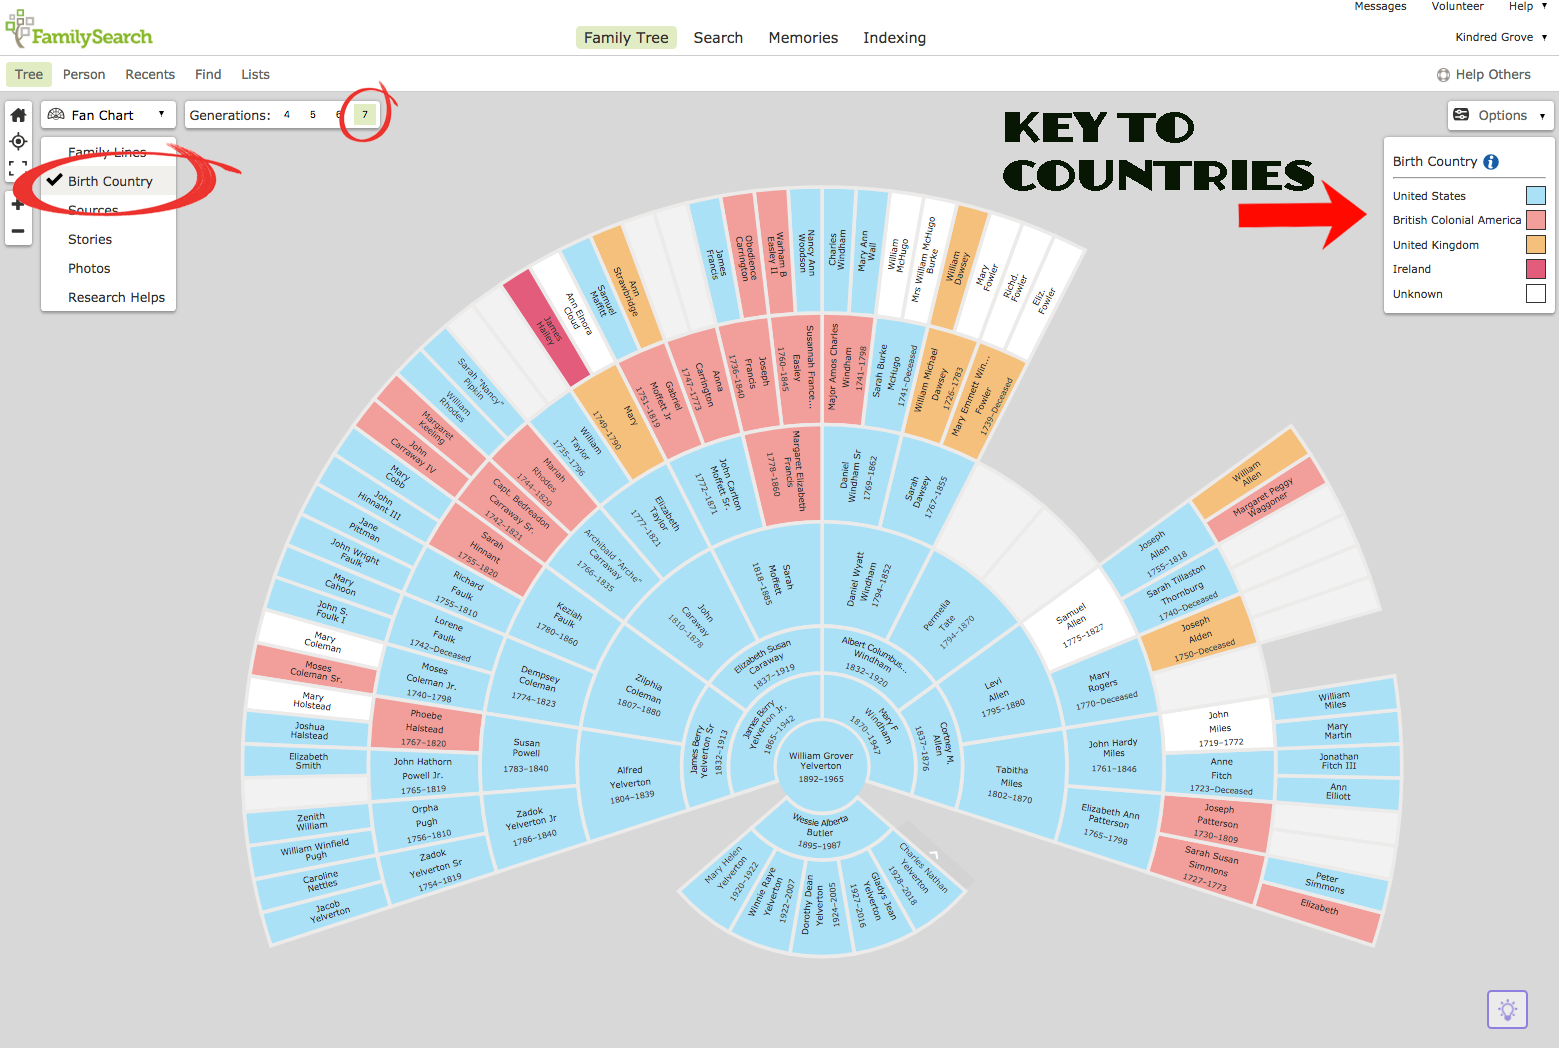
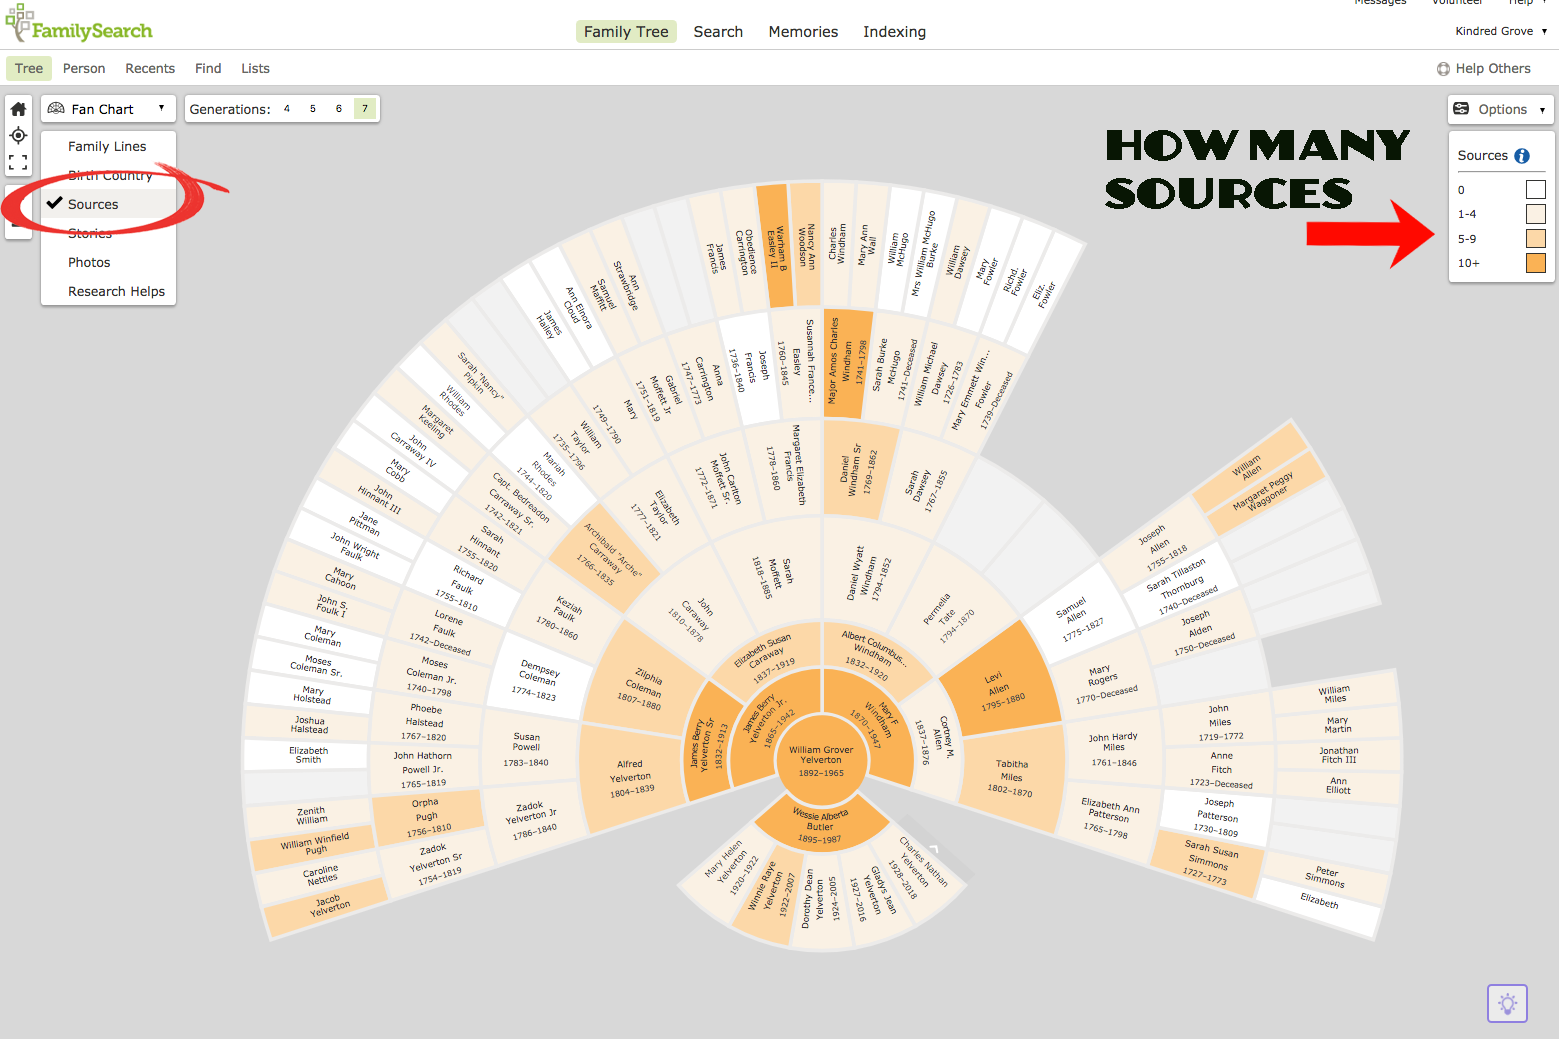
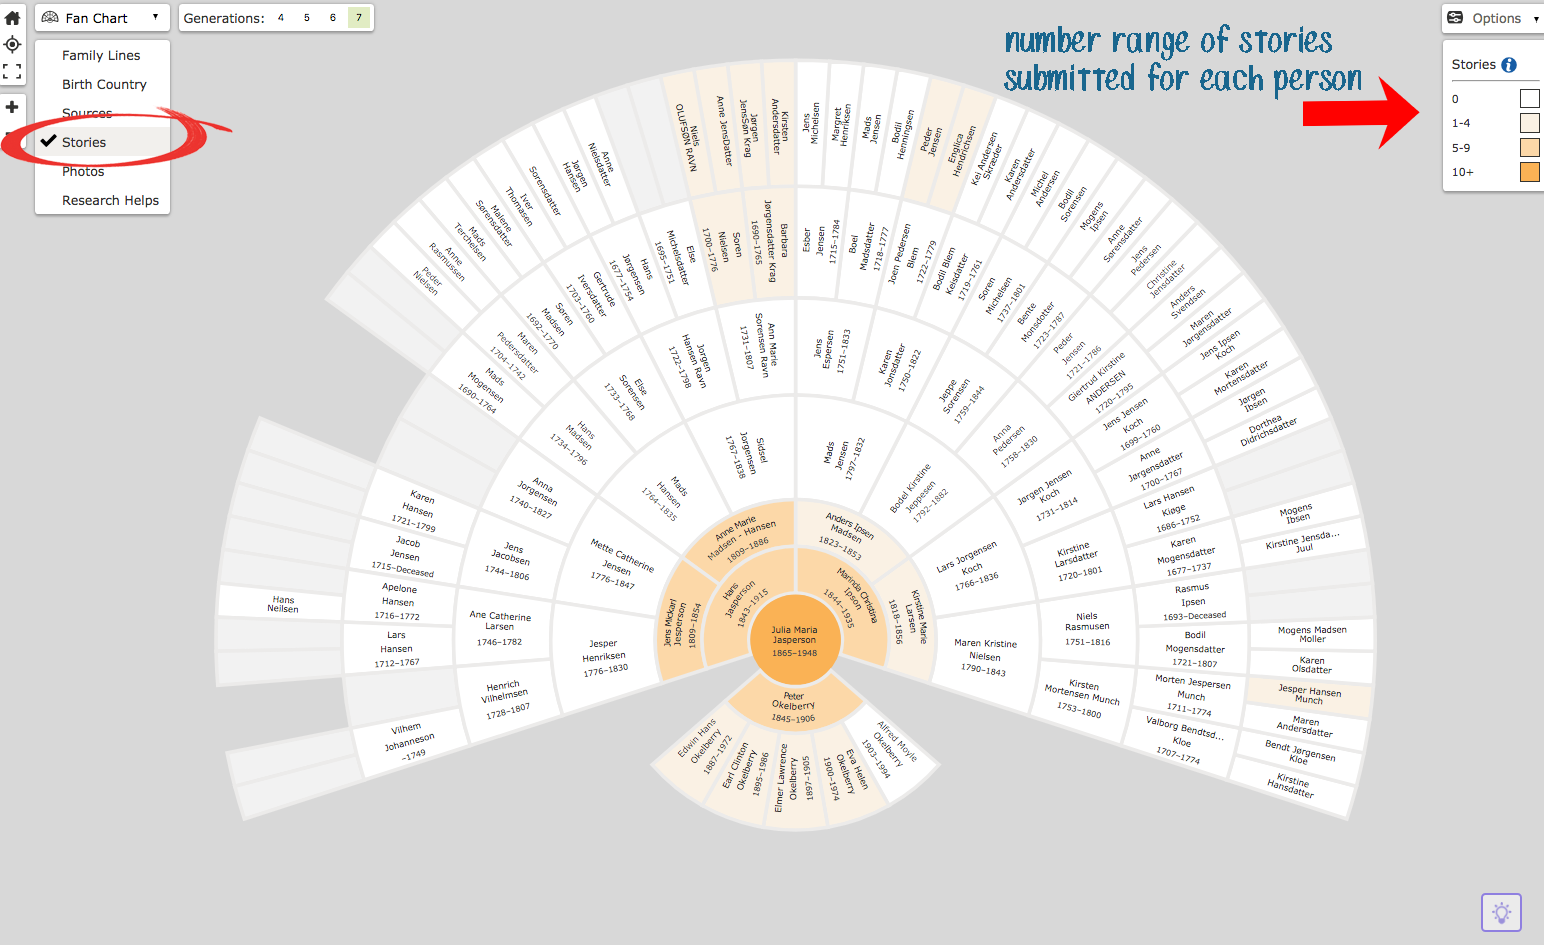
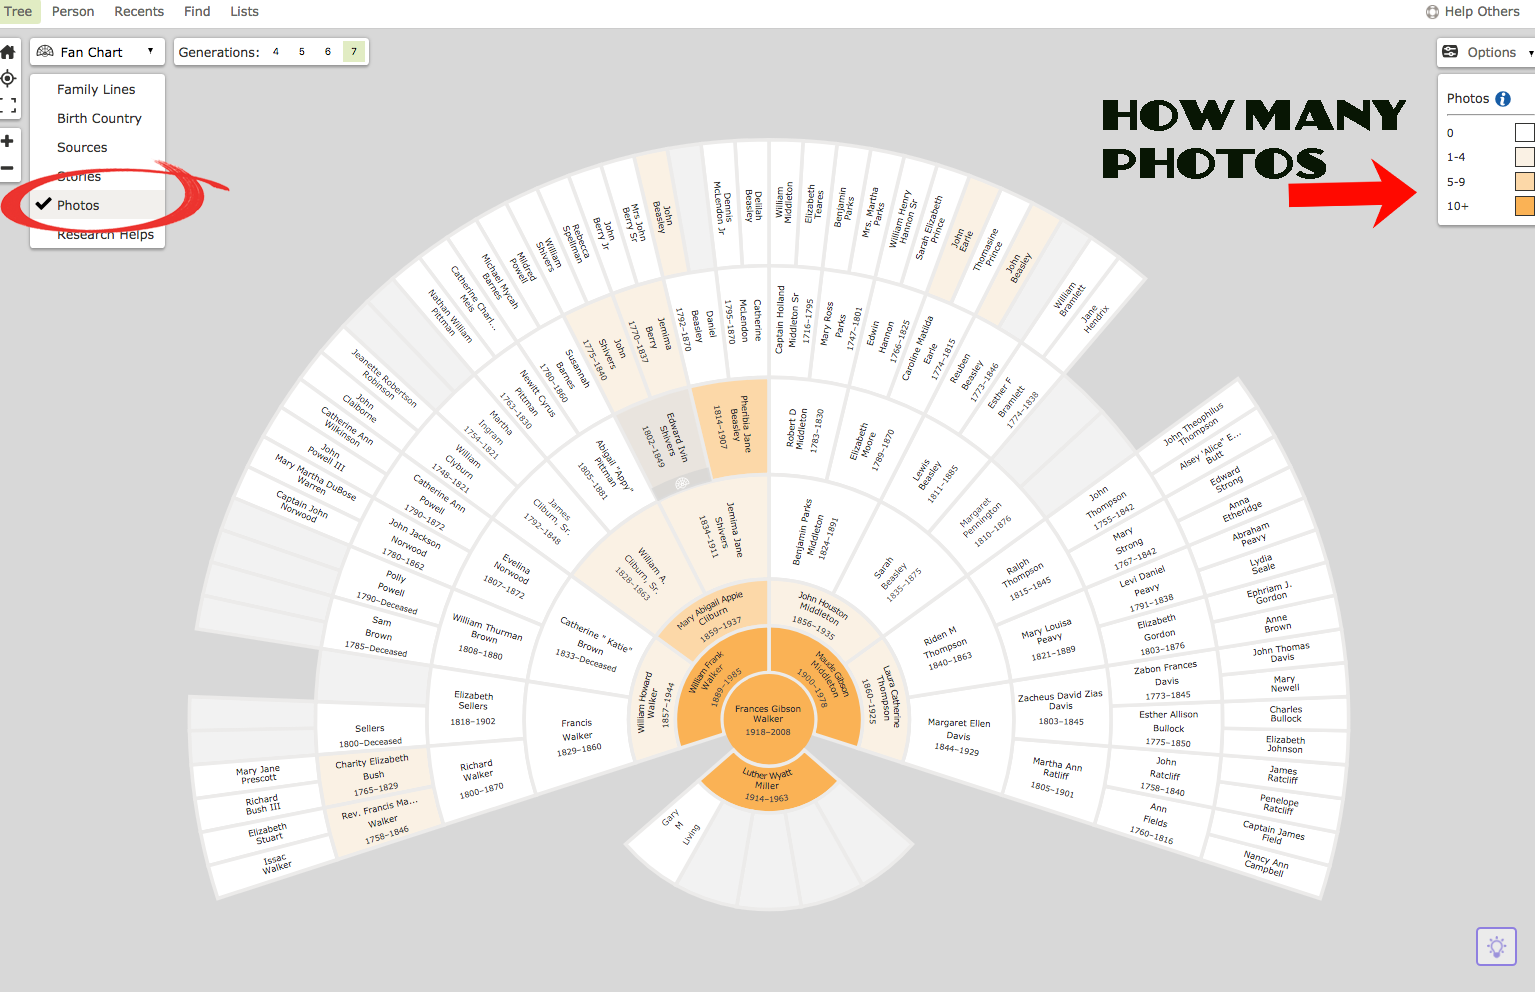
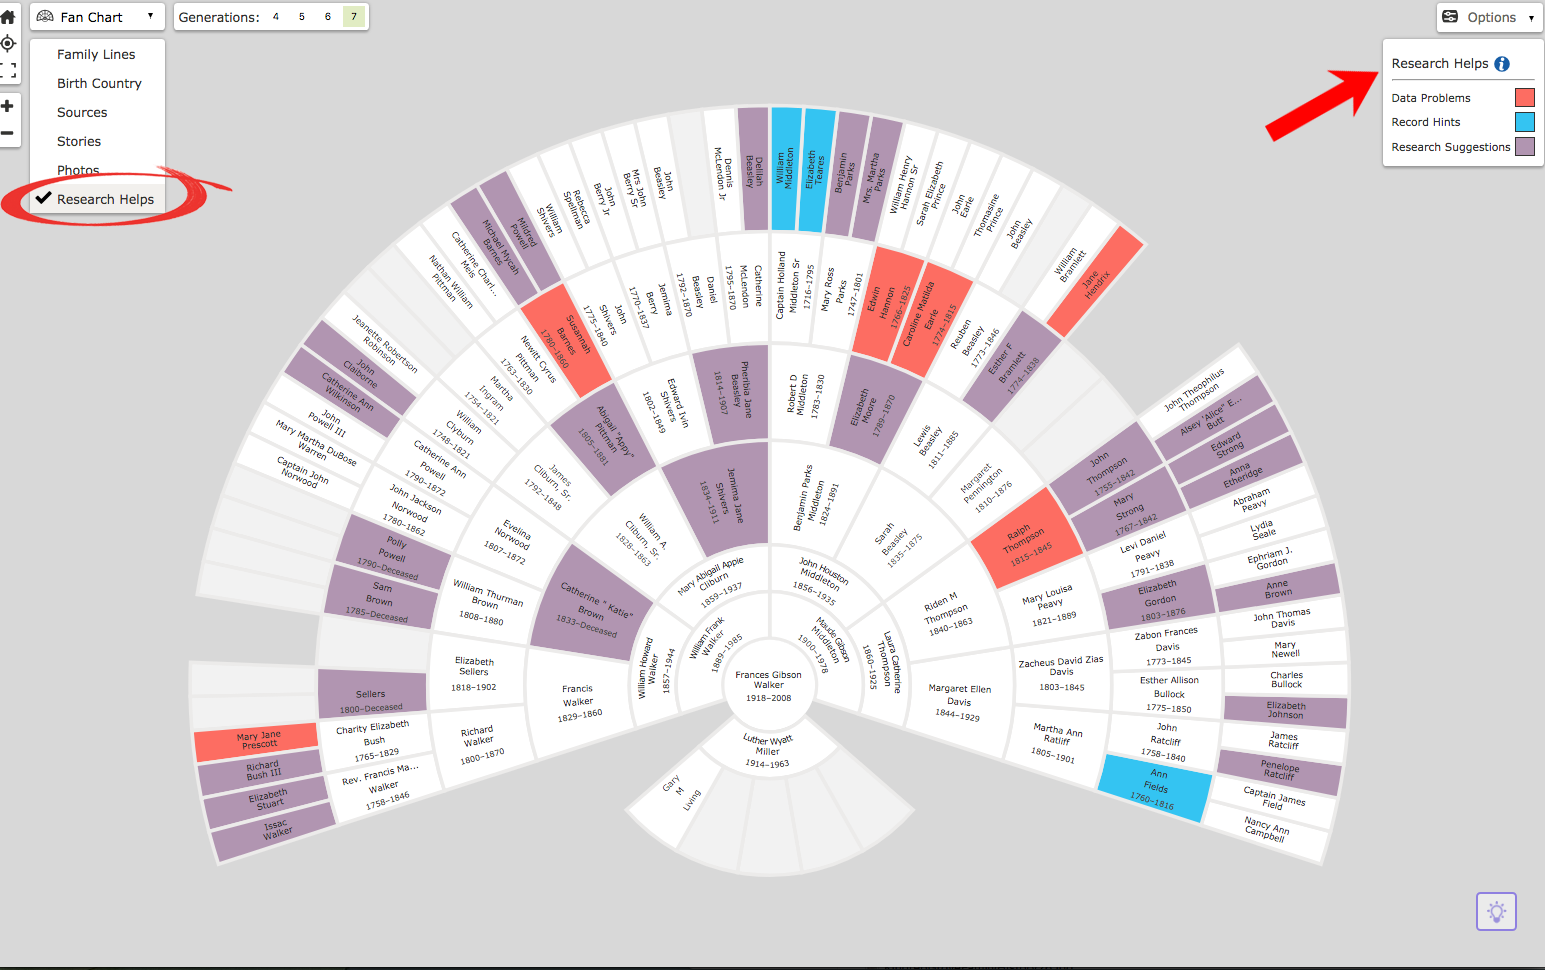
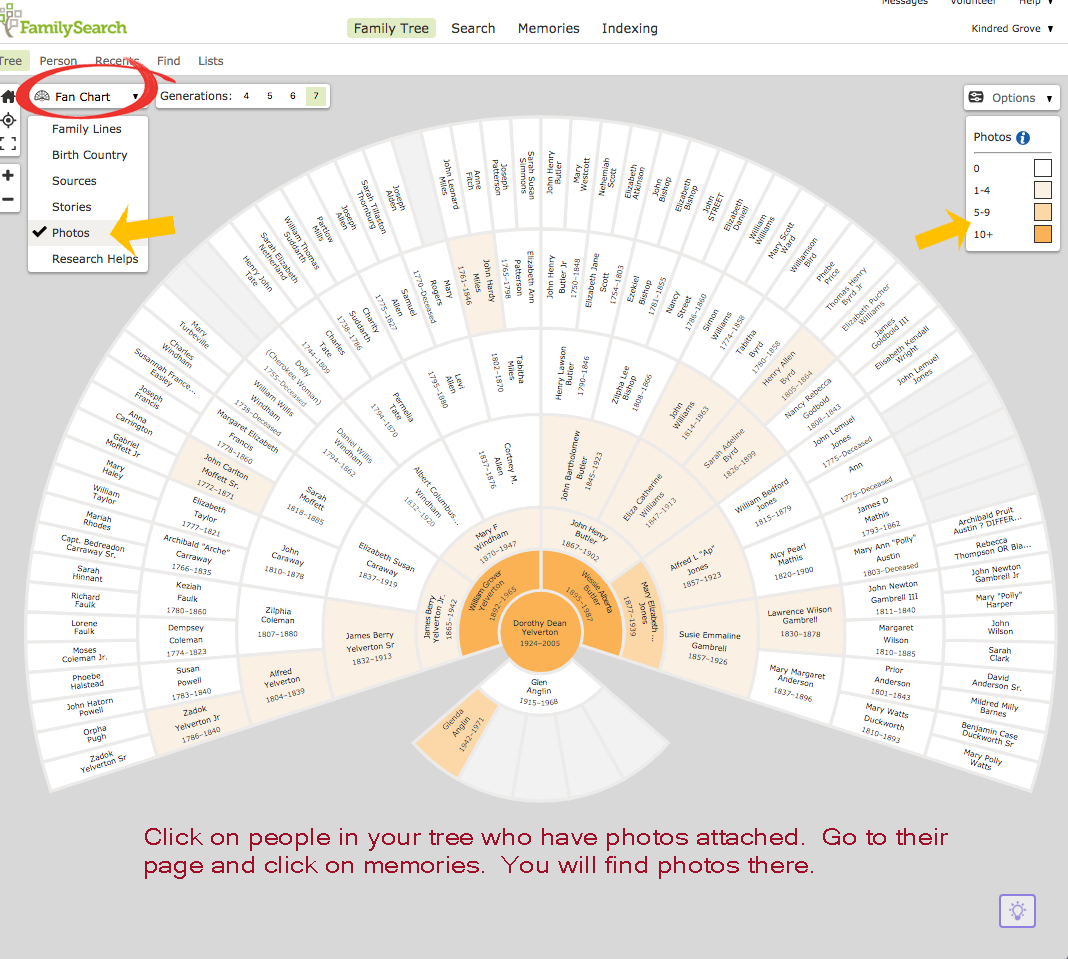
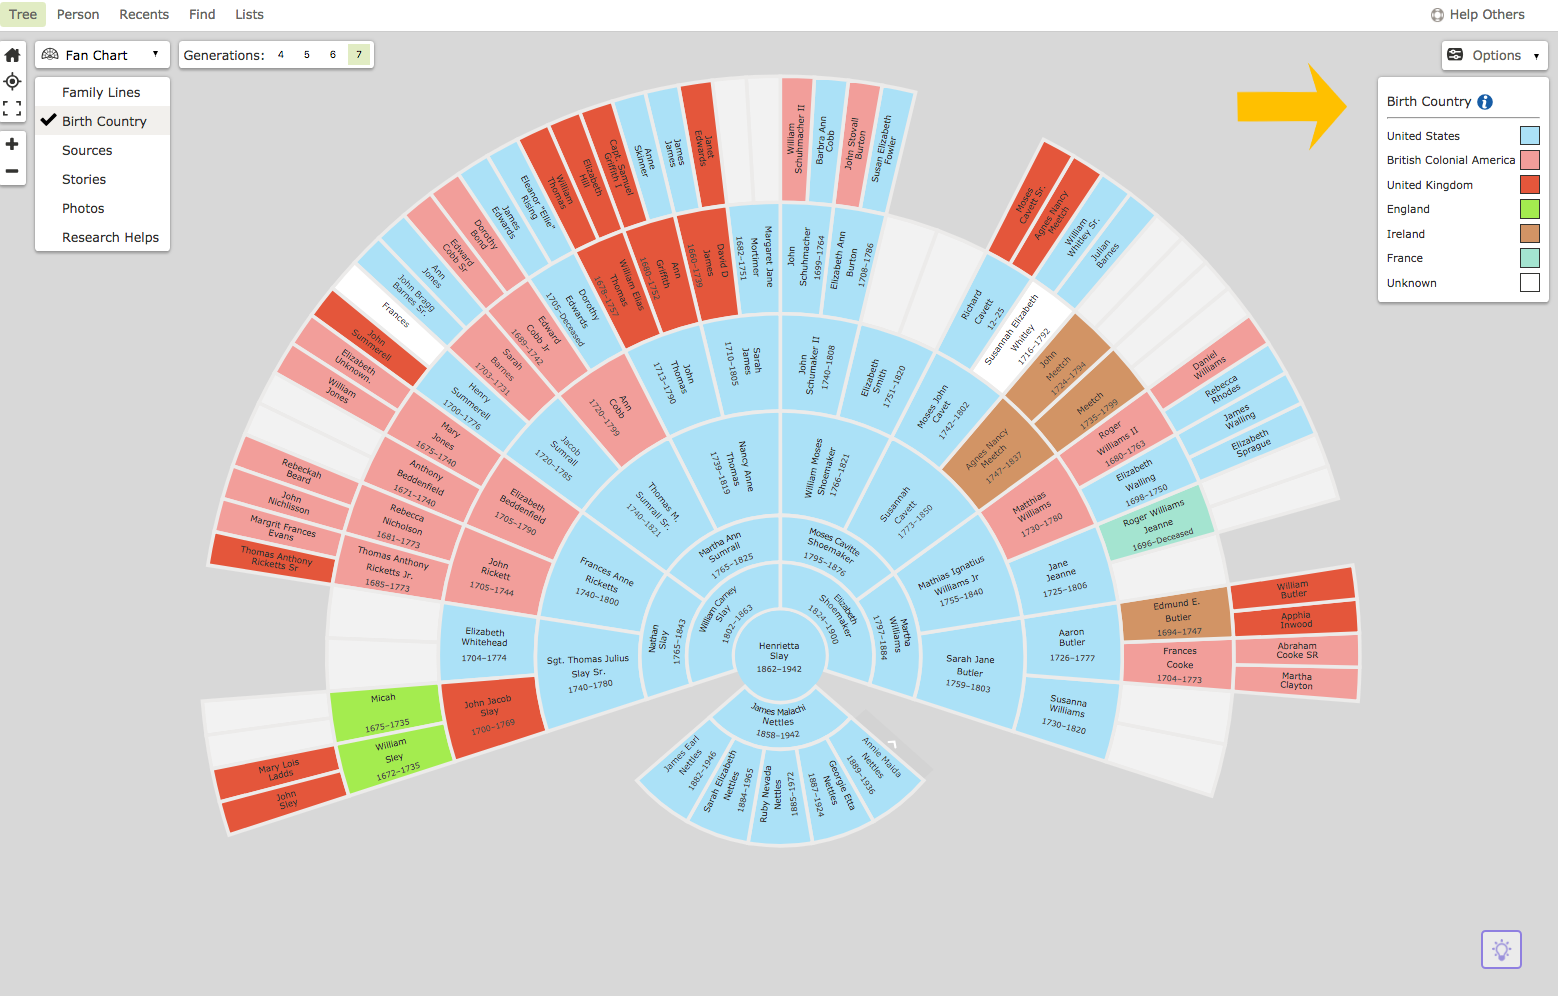
If you’d like to learn how to navigate through the different views and options in the tree, Click on the fan chart photo below to take you to another tutorial. 

DIVING IN

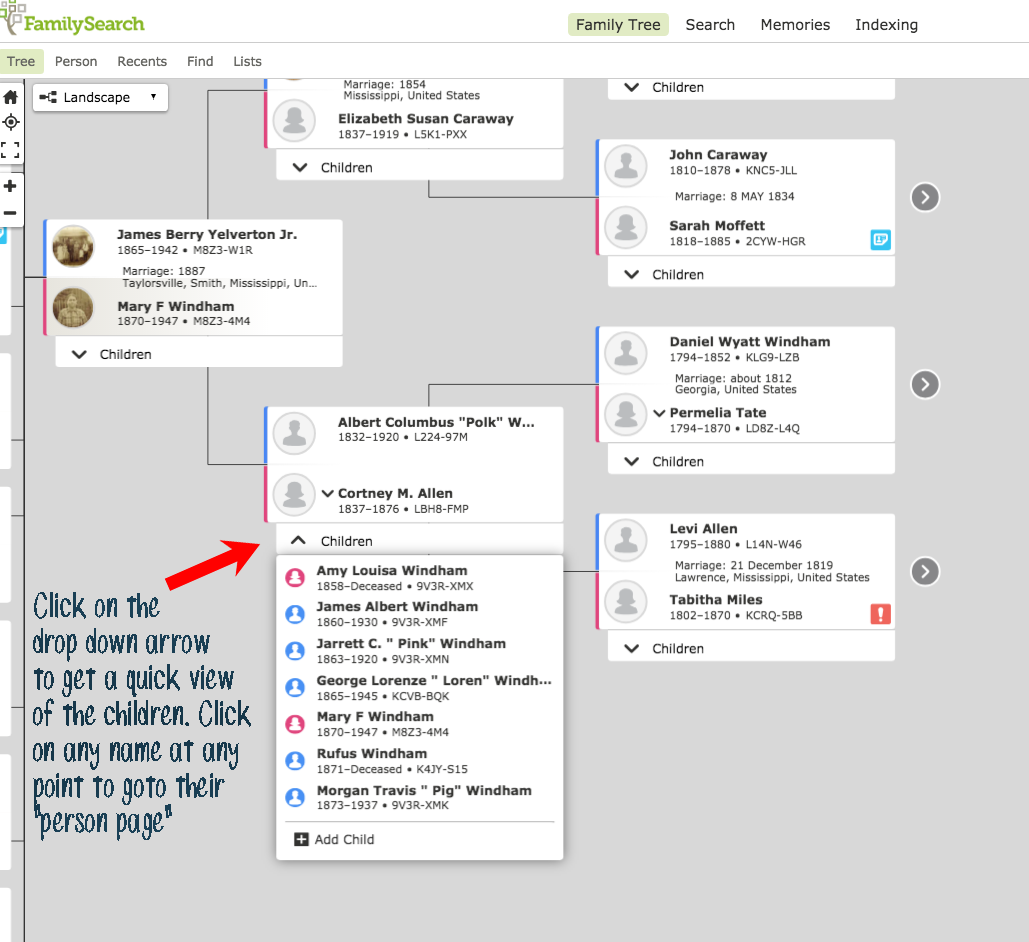
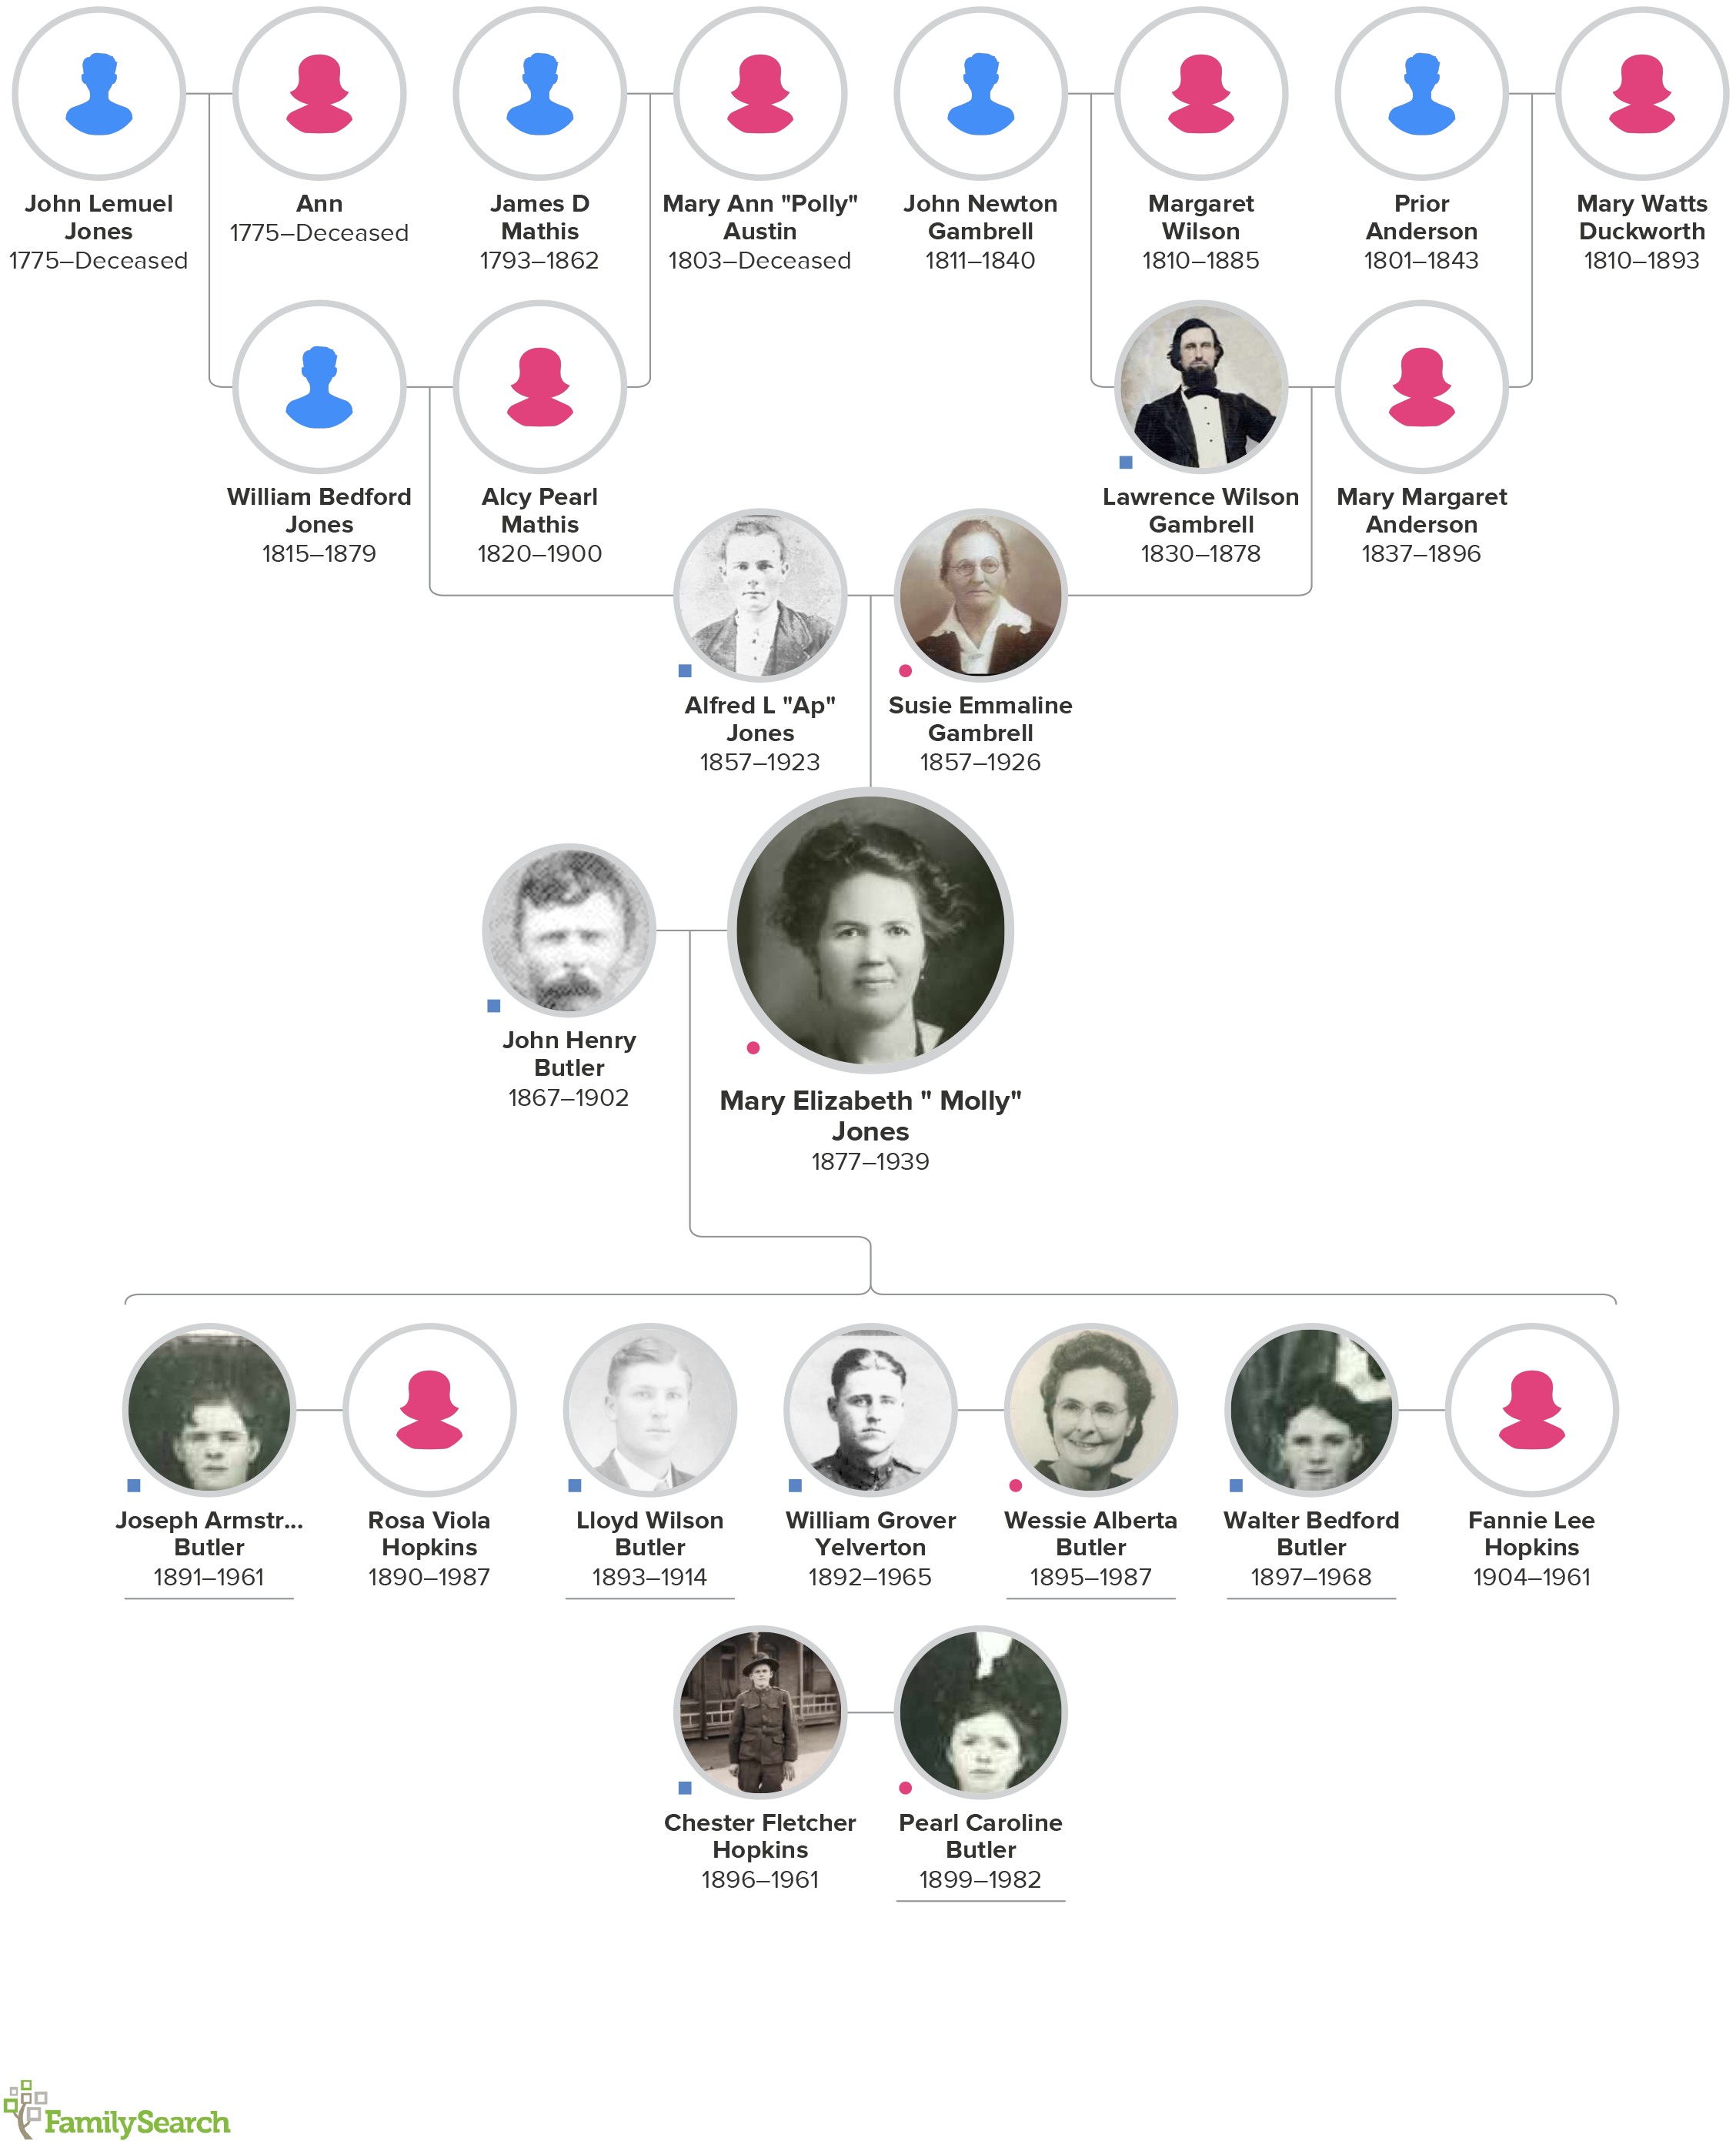
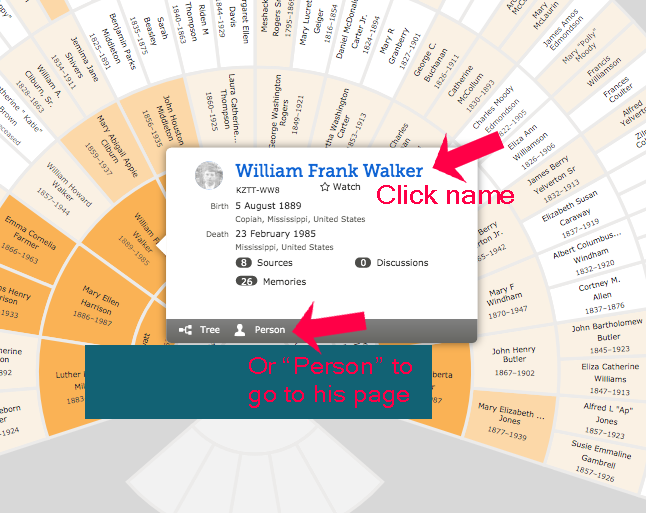
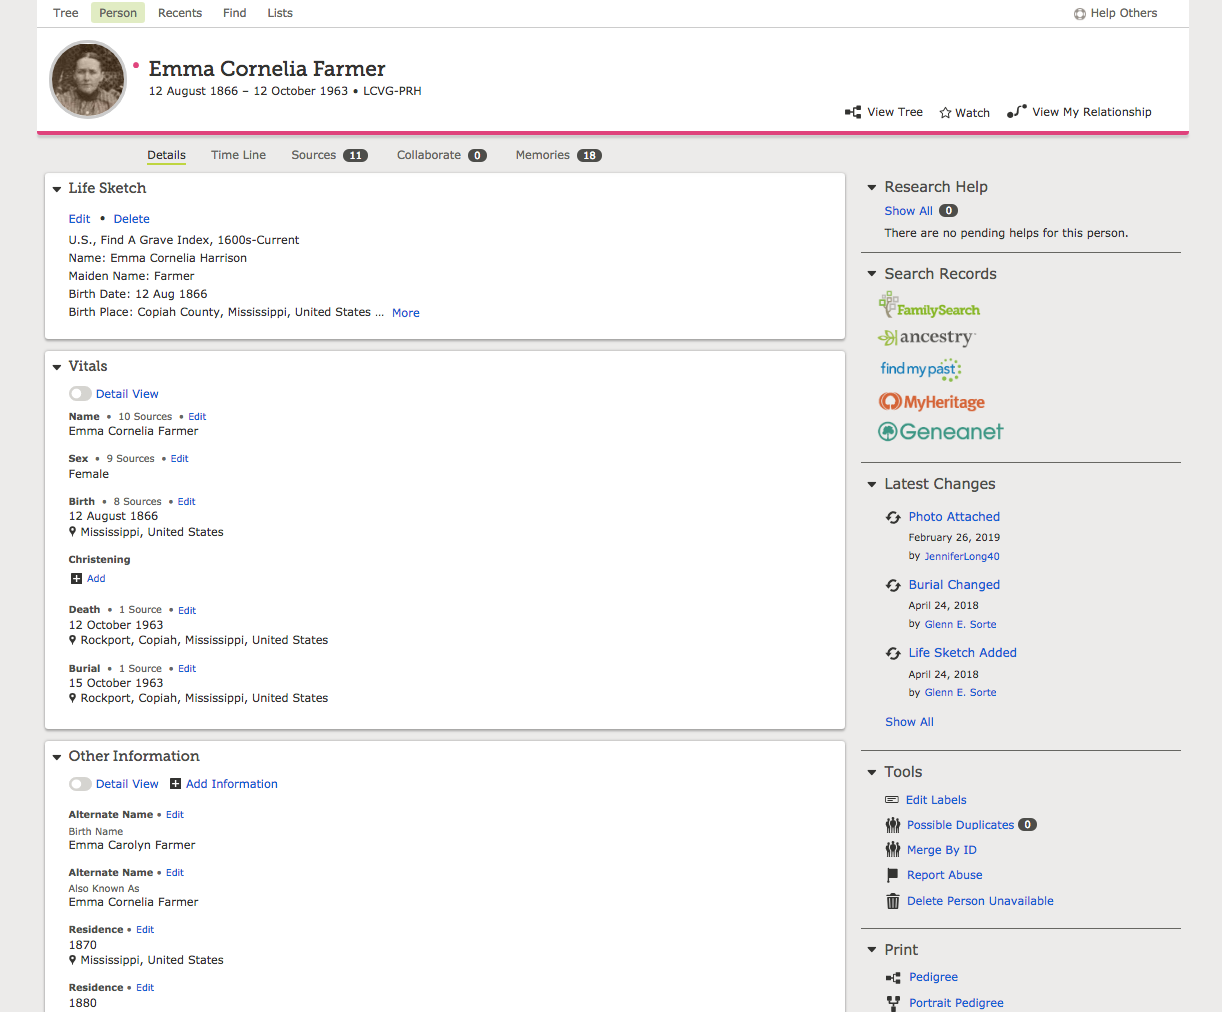
Once you are on the family tree view, it is helpful to know that each person’s name is also a LINK. When you click on a name, it will take you to their PERSON PAGE where you can see the vital information, sources, and memories are attached to them.  If there isn’t much information yet, don’t despair.  There is the potential for all of those resources to be added over time.  w

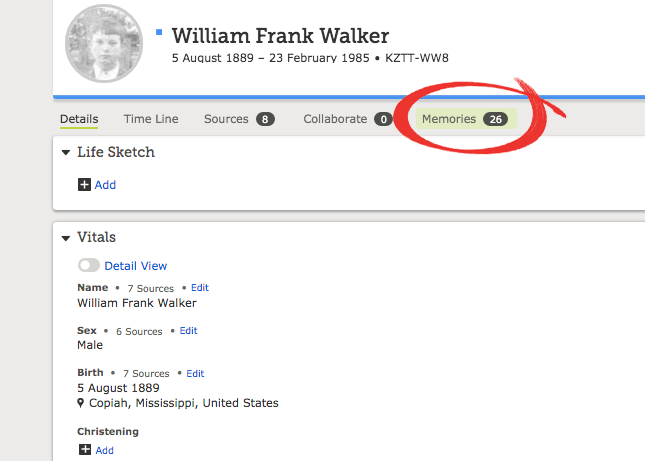
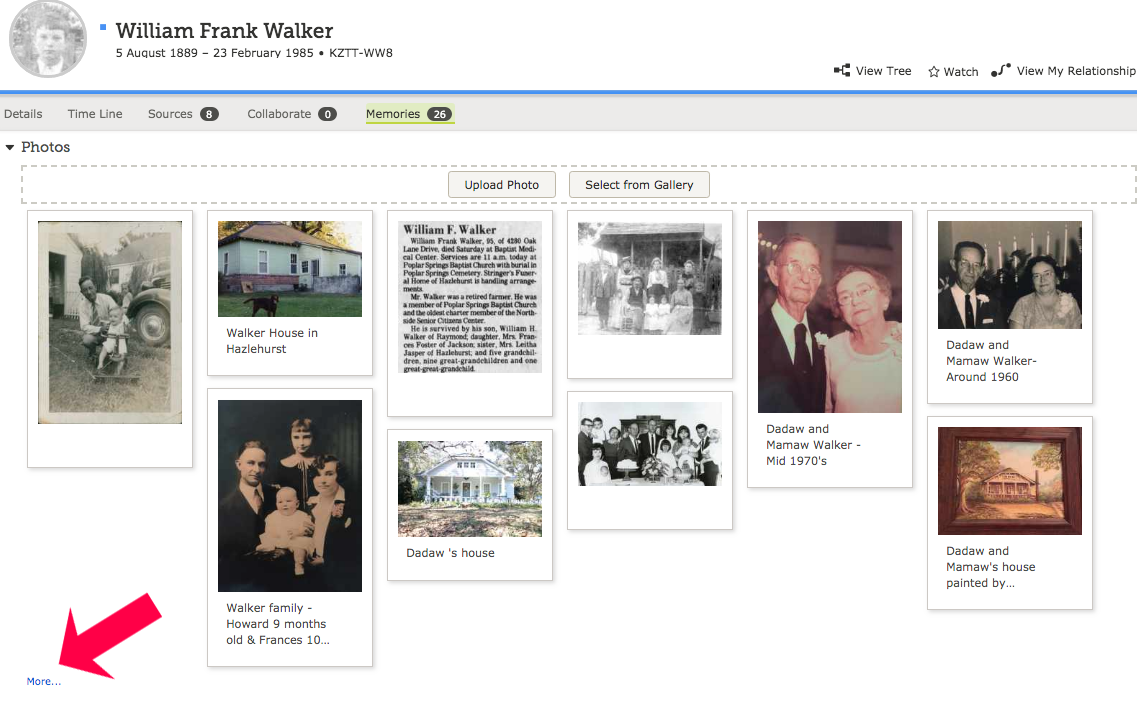
EXPLORING THE PERSON PAGE

From the person page, click on and explore through the menu options/ tool bar- specifically the memories tab. This is where photos and stories are located for each person. Hopefully you will find some of these already added for some of your ancestors.

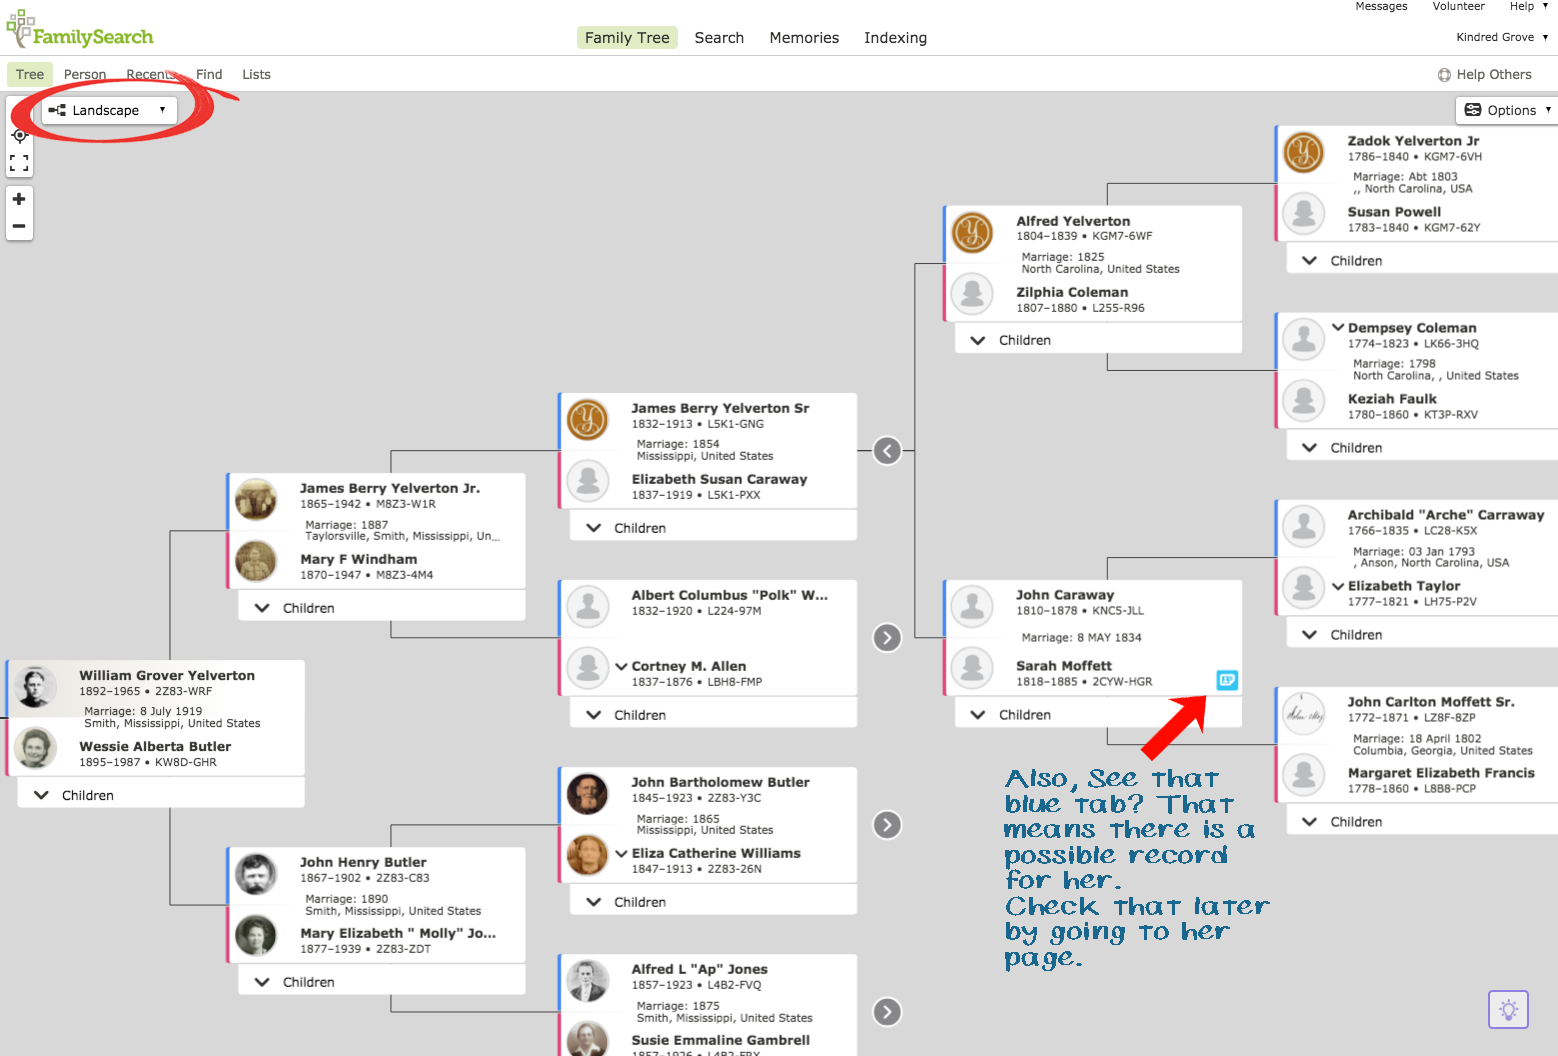
The sources tab is where documents and records are kept.

These are both great options for beginners to learn about their ancestors from the information and memories that have been added by others. You are on your way to discovering your family history!

There you go! You now have a family tree!

I hope this post has helped you to start your family history journey and answered some questions. Make sure to check through the other tutorials on the home page to help you learn more of the basics. 

How To Navigate the Family Tree In FamilySearch

How To Navigate the Family Tree In FamilySearch

     I am so excited to share some of the amazing features you can use with the family tree on FamilySearch! There are so many ways that these advancements can be utilized. If you haven’t explored them before, I hope that you will do so and make some new discoveries! (To get to the family tree, just click on Family Tree from the homepage or on the menu bar from any page on FamilySearch, as highlighted below. And if you need help getting started setting up your family tree in FamilySearch, start with this post HERE.)

Note- This tutorial shows the web browser view. Various viewing options are also available on the family tree app but are not shown here.

In these first three photos, you will see the default view of the tree.  This view of the tree is called LANDSCAPE.  As you will see below on the top left, there is a drop down menu with other options.  Landscape view is great for seeing the people’s names, dates and relationships as well. Look for the drop down menu below each couple, which will give you a list of their children. You can use to arrows to the right to branch out on each family line.  

This next view is called PORTRAIT. Use the drop down menu to select portrait.  If you have a lot of photos in your tree, this is a great way to visually see your family members in the tree.  Use the arrows above a line to branch out. This is also the view which is used on the app. 

The next view is the fan chart. The fan chart was recently updated and I LOVE IT!!! This is super fun and worth sitting at the computer for.  Once you get to the fan chart from the drop down menu, there will be another drop down menu with 6 options! Family lines just gives you the basic fan chart. 

When you click on birth countries, it gets more exciting and you will see the country of origin of each person. There is a key on the right to tell you what country each color stands for. Below are two examples.  This is a great way to get a birds-eye view of your tree and some of your heritage! Also, make sure your “generations” tab is selected as 7– to give you a greater view of the tree. That selection is just next to the fan chart menu on top left. 

If your tree doesn’t go back that far, that’s ok! I love that the fan chart can help you see what IS missing in your tree- and an idea of where it could use your help! Many people don’t know where to start in their family history research, and I believe this fan chart will help many people to find the answer to that question! The holes in your tree can be a great jumping off point! 

This next setting is for SOURCES.  Sources are typically records, cemetery/ headstone information, books, links or anything helpful that gives proof or indicators about that person’s life.  The more sources you can find on a person, the more you can get an overview and understanding about what their life may have been like.  Sources can help you know who they married, how many children they had, if they served in the military, jobs they worked, etc.  Sources are an invaluable resource! 

In this view of the tree, it is so helpful in that you can see how many sources are attached to each person. White means no sources and dark orange means ten or more (with indicators in between as well).  So, if I see someone in the tree here who is white or pale orange, that might be a good place for me to start.  Not only do sources help to paint a life story, but when I see a person with zero sources, I know that it’s not just records that are missing- but often times family members too.  By finding some family records, I will frequently find missing children who have not been added to the tree.  There are many discoveries left to be made and its really exciting! 

The next tab is for STORIES.  I love that this is included because I love reading stories of other people’s lives–especially within my own family.  But in all fairness, this doesn’t necessarily mean it is always a story that has been attached to that person.  It could be a note, a memory, a life sketch or even a theory that has been attached by a contributor.  Or, it could be an actual story or even a journal entry! Those are like gold!!! 

I love this feature for a few reasons-

1) You may find stories and information that has been added by others that you have never seen.

2)  It shows who has little to no stories attached. This is a wonderful invitation to find and add some.

3) This tool can help bridge the gap between us and those who came before us. 

4) It can help young people to quickly and easily find a story of an ancestor to read about, share in a lesson, or use in a school assignment.  There are so many possibilities of how this feature could be used!  

The next option is PHOTOS.  Again- I absolutely love this feature! I have always loved photos and I love finding them for my family members.  I am so appreciative when someone shares photos I have never seen.  In this day and age of technology, I love that we can share photos so easily and that so many people can enjoy the blessings of getting to see an old photo of their ancestor.  Photos are treasures and I love getting to see what is available in the tree. 

Since FamilySearch has a collaborative tree, this is one of the benefits of that group effort! As with the sources and stories, a white section of the fan chart is an invitation to find and add photos of your ancestors.

There are many who will be grateful for your willingness to add these precious memories to FamilySearch.  There is also peace of mind that comes with having a backup to family photographs.

The next feature is for RESEARCH HELPS.  These are little messages letting us know there is a suggestion (in purple) , an error or question (in red) with the information already in there (for example-a child that was born after the mother was deceased), or actual record hints (in blue).  Those blue tabs/ RECORD HINTS are MANNA FROM HEAVEN! They aren’t always for the right person, so please do review the information carefully to see if it is a match, but the back end of FamilySearch does a great job of suggesting records for the right person! Take advantage of the computer doing the work for you! 

Below is another feature if you’d like to view the tree in a different color.  Under the OPTIONS tab on the upper right corner, use the drop down menu to select INVERT COLORS.  This will change the background colors to grey and some people prefer this style better. 

Under that INVERT COLORS selection, you can also select Print.  

You can print a PDF of the tree in the portrait view.  This will show you four generations beyond the selected person and also their children and spouses.  You can print the tree with anyone as the main person.  So, for instance, if I want to print my great grandmother’s tree, I would go to her person page and then click VIEW TREE on HER PAGE.  This will then show me JUST her line (not her spouse’s, for instance).  

These printed trees are great in an album, framed and even as gifts.   

There is one more view of the tree- which is DESCENDANCYbut I am going to devote a separate post to that since it has a lot of features of its own.  Basically, instead of the typical ascending family tree, it will descend from an ancestor back towards you.   It shows their children and grandchildren- their descendants!

I hope that this tutorial has shown you a few features that can help you explore your family history in a new way. Feel free to leave any questions you may have about this post! 

Also, I’d love to know – What is your favorite view of the tree and how has it helped or enlightened you? Please comment below! 

How To Find Your Ancestor’s Photos on Family Search

How To Find Your Ancestor’s Photos on Family Search

 Seeing an ancestor’s photo for the first time is a magical thing- especially if you have searched and hoped to find one.  I have personally been on a mission the last few years to find as many photos as possible of my progenitors and it has been a wonderful labor of love.  It has taken some time since I started out with NONE but I have definitely found success! My hope is that I can share some tips to help you do the same and also save some time in the process.  

This post is #1 in a 10 part series I am working on to show you the best resources for finding family photos with ease- and certainly with reward! 

 Since Family Search is free and is built as a collaborative SHARED FAMILY TREE, it is a great place to start your search.  In this tutorial, I will show you two ways to quickly navigate the site and find photos of your ancestors.

NOTE Make sure you have already created a free family search account and connected to the tree.  I have another tutorial on that HERE if you need help getting started.  Once you have set up your tree, come back to this post and follow the steps below.

Method One: 

From the home page on Family Search, click on Family Tree.

(see photo below for example) 


This will take you to the tree.  In the TOP LEFT corner, make sure to SELECT:
FAN CHART
7 GENERATIONS
PHOTOS (in drop down menu)

Those with photos attached will appear light to dark orange.  The more photos attached to a person, the darker they will show up in the fan chart. 

FOR A FULL TUTORIAL ON NAVIGATING THE Family Tree & FAN CHART, GO HERE.


To see what photos are attached to that person, click on their name right there in the fan chart.  It will bring up a description tab (see photo below). 

I like to RIGHT CLICK on their NAME or where it says PERSON- and then click OPEN IN NEW TAB.  This isn’t necessary but does keep your fan chart open and takes you to a new page to view the person page.  I just find this easier.  But either way, go to the PERSON PAGE. 

Once you are on the PERSON PAGE, look for the MEMORIES tab.  Click on that. 

Now you can peruse through the photos (and stories too).  Don’t forget to click on MORE if it is displayed in the bottom left corner (see arrow in photo below) to open up ALL of the pictures in their memories. 

And that’s it for the first method.  Just repeat as desired with others in your tree! 

METHOD TWO: From the HOME PAGE, Click on MEMORIES and select OVERVIEW from Drop Down Menu. 

This will take you to the MEMORIES page where you will have several options for adding photos yourself etc., but for this tutorial, we are going to scroll down the page to the section where you can find photos others have uploaded. 


Go to the panel- Discover the memories others have shared about your family. Click on SEE MORE PEOPLE. 

Also, note that any time you want to WATCH a person, you can click on the star and you will be notified via email anytime someone adds or makes changes to that profile. 

Just look at this beautiful album of memories to explore! These are your “close family members” which may include parents, grandparents, siblings, aunts, uncles and cousins. These are only deceased individuals as Family Search keeps living people private and confidential. 

To look at the photos, just click on the tab you want.  Again, I prefer to RIGHT CLICK and select OPEN IN NEW TAB so that I don’t lose my place on the memories page. This will take me to the individual person’s memories for viewing. 

Another option is to search within this menu by name.  Just type in the name in the top right-hand corner.  This will show you what is available for that family. 

And that’s it for method two.  It’s pretty easy and fun to reap the fruits of other people’s generous acts of sharing! I would also like to add that if you do have family photos in your posession, please upload them and do the same for others.  There will be many grateful for your willingness to share the wonderful treasures of family photos! 

Please let me know if you have any questions! Happy hunting! 

Pin It on Pinterest